Tatting Shuttle Storage

Being a quilter, you work on long projects and take a project sebatical for a quick make. These quick makes help one make it through the tough part of that long project. Last Friday I watched the SewBecca live stream on youtube and was pleasantly surprised by the drawstring bag in the Open Gates project box. The project was a thread bag to hold all your threads when you go on retreat. The bag was cute. But when she finished the bag, I saw a different possibilities. I saw a tatting shuttle and thread ball holder. Even though I did not have the pattern, I followed Monique’s instructions on that video. I am pleased as punch with how cute this turned out!

I have always wanted a pretty alternative to my current tatting supply storage (a ziploc baggie). I feel I hit the jack pot. And it was so quick! A nice little break in sewing 16 patches.

This was perfectly sized! Isn’t it wonderful when you find something and repurpose it perfectly?

There is probably an easy way to attach this to your wrist so it will hold your ball while you tat. I forget what those are called, but usually you tat those with thread. It thrills me I can combine two hobbies together! I wonder if there would be a market for something like this on etsy? Any tatters out there please comment below with your thoughts.

Make sure to check out SewBecca and see how it’s made.

And did you see my mid week post? I designed another pattern and it is a free download. Interested in learning how to make a small heart block? Check it out here.

The newly added border blocks are done! I have started sewing this together, but made a change to the layout a bit. When I put these on my design wall they are all at pretty much easy reach eye level. Because the proportion of the quilt is turned sideways, while I stitch this together I am turning all my baskets and hearts 90 degrees to the right. After I get the majority of these stitched I will be able to present it correctly on the wall. Since each of these blocks are 4 inches finished, this top measures 36 by 72. Not very big, but a great start to a round robin! Yes, I have already selected the next motif and some are already up on my design wall. The next block is a 6 inch block. And I think I will do a triangle border after that and then see what calculations will make the next block potential. And it feels good to empty those scrap bins! I am in love the with the folk art style in this quilt and where this may go. It is very old fashioned looking eh? I can’t wait to show you what is next.

Last week’s goals:

  • Make more basket and heart blocks—-completed
  • Play with the layout of the basket and hearts—-played with it and did not like the idea in my head
  • Make the tutorial of the heart pattern—completed

Next week’s goals:

  • Sew some more on the next border
  • Look into my next quilt kit adventure and crunch the numbers
  • I have three new baby quilts to sew, one is already designed and am waiting on clothing from the mother so I can make a memory quilt for the little one, look into designs for the other two
  • Give a product review on a quilty item
  • Watch a few sewing live streams while I sew

I did pretty good this week for my back being out. Yeah Sunday morning the simple task of getting up off the couch threw it out. This used to happen before and three days of it and it would completely be gone. The good news is I have my mobility back, but there is a dull ache there and that has not went away. Ah, the joys of coming of age.

Thanks for stopping by and reading my blog!

Heart Free Pattern

Well, the weather turned cold and there is wintery mix falling at the house right about when I am to leave for work. Where I live we don’t have enough salt trucks to make the commute safe. We do have sand trucks, but that really does nothing to prevent an insurance seminar. So I made the call to stay home. Snow day equals Sew Day! Yay!

As you know I have been making basket blocks. If you are interested in these you can go here to get the pattern.

As the improv design goes along I added hearts to the basket mix, so why not offer that as a free pattern?

Ask and you shall receive!

The hearts have been fun!

I have filled a good snippet of these blocks and am moving on to some small 16 patches. And will probably turn this into a round robin quilt.

I shared this photo with you at the beginning of this quilts journey. I liked the scrappiness of the 16 patch, but it was too distracting in the quilt body. So it becomes a border. My scrap tub of the 1 1/2 inch squares was depleted last night. So I will be visiting my small untamed scraps as well as my strings to see if I can make this border by the weekend. The 16 patch blocks without the cutting take longer than cutting and making the basket blocks.

These patterns would be so pretty in a fabric line or just two solids. If you like my content please subscribe by following me. I love the likes and adore the comments!

Thanks for reading my blog!

Baskets, Hearts, and A Mystery Reveal

The design wall progressed! These little basket blocks whip up faster than a 16 patch! I am loving the direction this quilt design is taking!

I had an epiphany this morning while waking up and gazing upon the design wall. I will have to progress a few more blocks before I can see if I like the design in my head. Right here and now is where I am and it is looking pretty good. 🙂

Last night I made several baskets while watching Sew Becca live on youtube. She was having a colab with Open Gates Quilts. Fabulous items in that video. Sew Becca goes into details of Monique’s subscription box. February’s box had all the things that check all my boxes. I tried to order February’s, but I think I will be too late. The small bag instructions given in that video would be a perfect pouch to hold my tatting shuttles and ball of thread. I really want to make that. I am afraid to do that somewhat right now because that would mean clearing off my work spaces and making room for a new project. That would kind of kill the buzz I have going with this one. And we all know interruptions of this sort cause UFOs. I have too many of those as it is. I am torn. Click here for the Sew Becca video link.

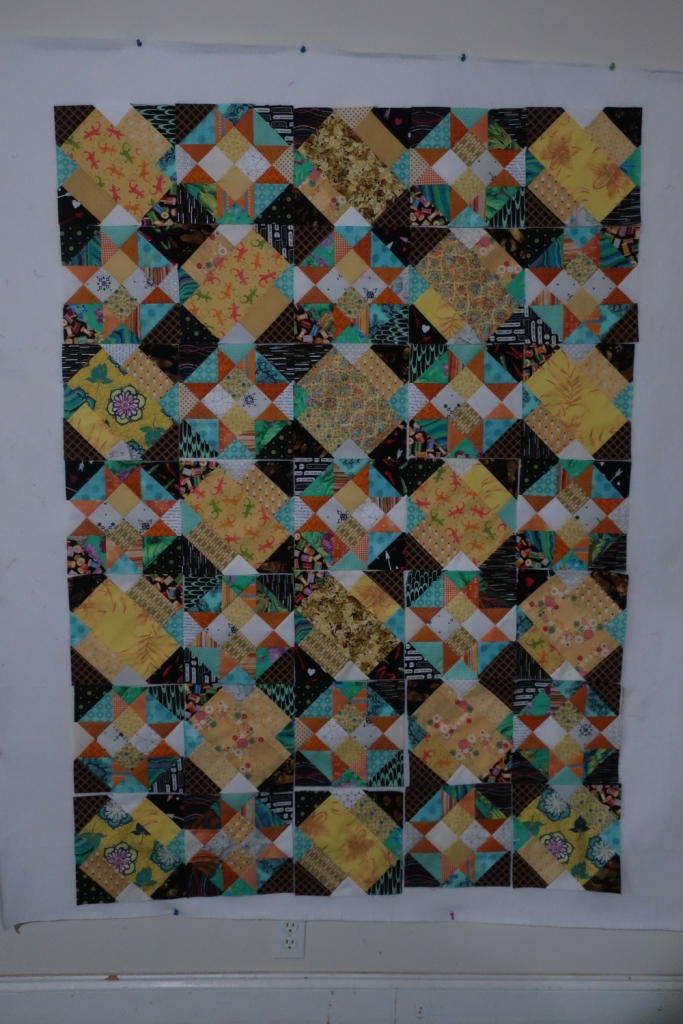
And now it is time to reveal some of the mystery business I have been holding back for a couple of months. First my colors I chose were black, turquoise, yellow, orange, and white.

The construction of this quilt was odd. The instructions for colors was horrible. I do not recommend making this. And I will say this pattern confused the heck out of my mother repeatedly and she had all the instructions from start to finish. The color selection assignments were all too confusing. I must say, it was confusing to me too. The mystery pattern used is called the Fools Gold Mystery Quilt Scrap Buster #8. Click here for the link to the pdf pattern.

This pattern used gi-normous scraps. I would really not call this a scrap pattern. Even thought I had a very quick quilt top, I give this pattern two thumbs down. The instructions are confusing. The color selection for the pattern needs work!

Here are the two blocks that make up the quilt.

And here is the blocks on the design wall waiting to be sewn.

And then just like that it was a top!

And yes, I got turned around while laying this out, and so not all the blocks are turned right. I realized this as I was sewing the last row. Damn….but the mistake does not take away or add to it visually. It may go unnoticed if I would not have said anything.

The dimensions are rather small so I will end up either giving this as a baby quilt. You cannot go scrappy with a border with their instructions. Very strange part of the pattern. So my borders became a design element/edit. I am leaving this as it is, and it is ready to quilt in the project bag. I do like the color combo in this, and it may Segway into another quilt.

Visiting my goals for the week:

  • Make some pillow cases (I made two and gifted them)
  • Sew more baskets (done)
  • Share the Charming Baskets pattern (done)
  • Scrap Happy post (posted)
  • Quilt on 365 weather permitting (the weather did permit but I am waiting for a circle ruler to come in)

Goals for the upcoming week:

  • Make more basket and heart blocks
  • Play with the layout of the baskets and hearts
  • Make a tutorial of the heart pattern

It is supposed to snow again this week. A trip down memory lane, I recall going to school in my youth and getting so energized by anticipating the name of the school being called on the radio for cancellation. As an adult, the anticipation of weather events like this, still has this impact on me. I get so excited by the fact I will be able to blow off work and do whatever I want in the confines of my home. I wonder why I get so excited by these events? Perhaps I never really grew up. As an adult, my main responsibility is to earn a living and perhaps this is kind of a middle finger to corporate America, I cannot make them any money. It is like I am telling my employer “NO, and you can’t make me.” This makes me giggle. I am certain if my responsibility involved my own business it would be TOTALLY different. Deviation from responsibility is pretty awesome at any age eh?

Photo by Egor Kamelev on Pexels.com

Let’s just see what the week holds……and thanks for stopping by and reading my blog!

Scrap Happy February 22

Hi Scrap fabric enthusiasts! Welcome to my blog! It has been a busy month. I have a couple of finishes and a freebie.

First the finishes. I think I started this around 6 years ago. It has Y seams and my first blocks were not that great, but as time went on, they got better and became perfected as with anything. If you are afraid of Y seams, do not be. Just like when you learned to write cursive, it was not a fluid as you like in the beginning but after practice you get the hang of it and you own it!

Presenting Jack’s Chain Circles as a completed top!

This is so photo genic! I am very pleased. This is now in a different UFO pile, the quilting pile. Those quilts have piled up!

This is now also a top, introducing 60 degree stars, a pattern by Missouri Star Quilt Co. I have never made a quilt that was not square. A few of my quilts have scalloped edges, but none are in a shape other than a square or a rectangle. This is a fun throw size and I can’t wait to get this quilted up!

For several months my mind has toyed with the idea of creating a basket block. I wanted to create it using charm squares. And I finally figured out how to make it work! I have purged my larger scraps and have cut 5 inch squares from them and created a very scrappy folk-arty basket block. The block measures 4 inches finished. I am now offering this as a free pattern download which you can get right here on this blog.

There you go. I made several of these and they take very little time to make. And I decided to make every other block a basket block. I could opt to have negative space in between, but wanted a 9 patch. The nine patch math does not do well with this size finished block. So I opted for a 4 patch and a 16 patch. Those did not audition well.

This was too busy and loud. And then I thought, ah….hearts, I mean it is a month for a LOVEly theme eh? So hearts it is!

Perhaps the scraps left over from making these blocks will yield a few for a 16 patch border. I am a long ways from that. If you missed yesterdays post you can also read up on utilizing a jelly roll precut with this pattern. This pattern would be marvelous in a fabric matched line! Or even just one background and one solid! How about homespun baskets? Polka dot baskets? Striped baskets. All of these would be a wonderful theme. Unlimited possibilities. I also highly encourage you to share this blog post on social media so every scrap bustin’ quilter can take advantage of this pattern. I noticed just yesterday on social media that Laundry basket quilts has also made a block very similar to this. I don’t think her handles are on the bias and I have no idea how they are constructed. But my pattern is free!!!!!

In the coming month I will also make a point to share the heart pattern, but for now I will just focus on baskets.

In the meantime, stitch those scraps!

Curious to see what others are ScrapHappy about? Please clink the links below to see what everyone is working on. Thank you Gun and Kate!

KateGun, EvaSue, Lynn, Lynda,
Birthe, Turid, Susan, Cathy,  Tracy, Jill,
Claire, JanMoira, SandraChrisAlys,
ClaireJeanJon, DawnJuleGwen,
Bekki, Sunny, Kjerstin, Sue LVera,
NanetteAnn, Dawn 2, Bear, Carol,
Preeti, EdithDebbierose and Esther

And thanks for reading my blog!

Charming Basket Free Pattern

Happy Valentine’s Day! I would like to take the time to thank all of you who follow, subscribe, and comment. I cannot do this with out you. As a way of saying thank you I have designed a quilt block and wrote a pattern which I am gifting to you. The blog community is amazing as well as the quilting community. Thank you!

The pattern is written specifically for using two charm squares. If you chose ric-rac for the handle you could use a jelly roll 2 1/2 inch strips.

Without further ado click below for the pattern.

And thanks for reading my blog!

A HotchPotch week

Hotchpotch literally translates to hodgepodge. The definition of hodgepodge is a cooking term to mix a bunch of stuff and throw it in a pot to cook.

In the quilting realm, I cooked up a bunch of hotchpotch! Very random stuff this week, ha. But, before I get to that stuff I would like to share the “Iced Trees” pictures from the winter we had, a whole season of winter in like 4 days, hahahaha.

Notice the depth of snow/sleet on the roof top in the bottom corner. As pretty as this is, in Texas we do not have massive amounts of sand for sand trucks or salt and really no way to spread it because if they purchased those things it would maybe be used 3 times every 5 years. So, we become paralyzed until we thaw. It is so peaceful when this happens. There is no noise pollution of cars running. The town is quiet. Embrace what is thrown at you, there is beauty in everything. You may not be able to see it at the time, but will be able to find that through self reflection later.

And my design wall has been busy! After completing jacks chain, I pulled out yet another UFO.

This is Becolorful Fanciful Flight by Jacqueline DeJonge. This is how much I have done in the past. I ironed some and cut some melons and sewed a few of those together (not pictured). And as pretty as this is, I am not feeling it. So off the design wall it came. I will be packing this away for another time. I estimate after looking at this, I do not have that much left. I think there are 4 quandrants to 4 more larger paperpieced centers, and of course the melons. Eventually this one will happen, but not right now.

I tatted a heart and boy am I out of practice! Glad I did not pick up the doily I was working on, it took too much re-do to make this acceptable.

I did get some of the second cog worked on. This still lacks another row of stars and hexis. I am rather stalled at the moment on what fabric I should select. I was going to go with the blue in the center and then I put it away, I am letting this simmer in my hotchpotch LOL! Gosh, if I think about all the projects I have left simmer….hmmmm. These cogs are not sewn together but pinned to the wall to see how they look. I am liking the white from one cog, which helps complete the other cog. I will let this be for now.

A very small sample of the mystery quilt I worked on back in Dec. Ridiculous prints, but fun to make. Sorry, I cannot share more than this. Soon, I promise!

And I have been making Charming Basket blocks. These are so fast, and the folk-art-e-ness of them is wonderful. Playing with the layout too. Uncertain how this will come together, but playing with these is fun and perfect sewing after a hard days work. These are a quick sew, to release your day’s demons and allow some relaxation and therapy!

Don’t forget, I am giving away this awesome block pattern for free on Feb 14th. Save the date!

Wouldn’t a friendship star in between these be cute? Or even a 9 patch? hmmmm….more simmering hotchpotch.

Goals met for the week:

  • Finish Jack’s Chain into a top—-check mark
  • Sew some more on La Passacaglia cog—-check mark
  • Start a new project or work on an old project—-check mark, check mark
  • rearrange my fabric shelves to accept new bolts of fabric—-check mark
  • share some mystery sewing from dec—-check mark

Goals for the upcoming week:

  • Make some pillow cases
  • sew more baskets
  • share the charming baskets pattern
  • Get back to the quilting machine and the 365 quilt (weather will have to warm up)
  • scrap happy post

Oh, and I almost forgot, I had ordered a ream of clean newsprint to make photo copies of my sketch design for quilting the 365. Those arrived and I am happy to say, running clean newsprint though my printer has been successful, so I will not have to hand trace every piece. I ran about 40 copies yesterday and really want to stitch one of these out to see how hard it will be to pick out the newsprint once the design is stitched. We finally warmed up yesterday to 74 degrees but because we had so many days below freezing the cement slab of the “quilt studio” will have to gradually warm up before it is warm enough to quilt. I suspect in the coming weeks we will have a warm snap in the 80s. That is usually how it goes and then it cools off again.

What a week! I think I made the most of it, eh? Thanks for reading my blog!

EPP Fussy Cutting Tip

The summary of my week. It snowed! This left me with extra days to hobby! And quilt I did!

Great progress was made with Jack’s chain. I have all the triangles sewn. I have 4 rows left to sew and two blocks to stitch to the large row. This is time consuming because all the intersections are Y seams. I think I have mastered the Y seam. The only thing I do not like about sewing Y seams is all the thread waste because you cannot chain piece and sew through until the end. I am very close to having this UFO in the “finished flimsy, take me quilting bag”.

I made such good progress on Jack’s Chain I opted to get out another UFO which is probably in the most infantile state because it has much growing to do.

I selected to work on my La Passacaglia Millifiori. I only have completed one full cog. I am working on a large partial cog directly to it’s left in the pattern.

According to my records I have not worked a stitch on this cog since April of 2021. This snow weather event changed that.

The remaining red was added. Also the outermost white with the tan diamonds. Yesterday I decided to fussy cut these hexagons. I also decided to make a short stop gap animation video of this outermost work.

This video was hard work, but fun with fabric!

And, I am not sure if anyone who does EPP knows this, but there is a fussy cut tip that I invented. It may already be out there, I have not researched it. But this was thought up yesterday on how to get my fussy cuts exact without just using the eyeball method using what I had around the house since I was iced in.

I first cut a strip of chevron fabric and made one cut from that strip. I then laid the template over the fabric and took a sharpie and drew the pattern onto the template. You can see my zig-zag line on the video clip above. The line drawn allowed me to perfectly line up my template for all 16 cuts that are exact.

You are probably thinking, what is wrong with you? Don’t you know that sharpie is a permanent marker? Indeed it is. By using this marker you will never have to worry about the ink rubbing off onto your fabric. Did you know that sharpies are alcohol based markers and therefore NOT permanent? Yeah, you can rub off the ink using 99% Isopropyl alcohol.

If you would like more of a tutorial, I created a video on that as well.

If you don’t want to watch the video, there is a picture towards the end where it shows I have wiped off my template with alcohol. It is a still photo, but this does work. I use a sharpie in my 40 hour paid job and know that alcohol removes ink. I was so confident in knowing it removes ink, I marked my template without a care in the world.

You can somewhat see the ink on the paper towel.

After marking the top of the template, I then thought how am I going to align this on the paper to make it perfect every time. That is covered in the video. You turn the template over, the template already has the seam allowance, you just put the paper piece on and make sure the lines on the template match the line placement on the paper.

Viola, exact fussy cutting for EPP!

Goals met for the week:

  • Make progress on the Jack’s Chain—-check
  • Start thinking about next UFO vs new project—check
  • Start sewing some EPP—check
  • Tat on the Jan Stawasz doily—incomplete
  • Look into solution on the 365 quilt pantos I need to make—check
    • Turns out you can purchase clean newsprint for your printer. This has been ordered and am awaiting its delivery

So the week allowed many goals to be met. As much as I wanted to tat, I did not want to tat on the doily. I wanted to tat hearts. I refrained. I do not need to start another project. I behaved myself LOL.

Goals for the upcoming week:

  • Finish Jack’s Chain into a top
  • Sew some more on the La Passacaglia cog
  • Start a new project or restart an old project!!
  • Rearrangement of fabrics because I have 7-8 bolts of fabric coming and I have not a clue where it will all go. Sew Yeah has hurt my pocketbook once again!
  • Share some mystery sewing from December

I am excited to see what I can get done in the coming week. I also have a mystery subscription box that will be arriving. Well, I am off to keep warm and quilt on!

Thanks for reading my blog!