RDP ~HOME

apartment architecture city colorful
Photo by Pixabay on Pexels.com

architecture beach booth colorful

Aren’t these photos a great inspiration to create a quilt color scheme?  Finding inspiration at HOME!

Expanding vocabulary and todays word is home.  While reading the ragtag daily prmpt today, it immediately made me think of an old country song by Joe Diffie, simply called HOME.

Home means all kinds of different things to different people.  In the objective view of the word, it is where I gravitate from in the mornings and gravitate to in the evenings.  It is comfort and something in a state of chaos.  Home is a job, something that has many chores daily, with no pay.  Home is full of neccessary evils, that procrastination causes pile ups.  Home is where I cherrish my family and their relationships.  Home’s list of honey do’s is staggering.  A house is not neccessarily a home.  A house is a monetary representation of status and clout.  The home part is free of these things.

Home is where I clean.  Home is where I create quilt art.  Home shelters me better than just any ole’ house.  Home is the hearth.  It is the amalgamation of sticks and stones and the hard work keeping their placement.  Home is family and friends, togetherness with invisible bonds that last a lifetime.  Home is memories, Home makes memories.

Home is a thing of the past, present, and future.  Thanks Joe Diffie for a song tbat says HOME so elloquently!


Fleeking Periwinkle

After reading a daily word prompt blog, and the daily word being fleek, I just had to look up the meaning.  It is slang and means “on point.”. Of all daily prompts, this one is so perfect, a quilters catch phrase this should be!

The periwinkle blocks I have slowly been working with paperless piecing , I now have a nice grouping for a photo op, but not enough for a quilt.  So from this point foward the periwinkle quilt I am working on is formally named Fleeking Periwinkle!  Interested in expanding your vocabulary and writting about it?  You can click here for RDP which stands for Rag Tag Daily Prompt and follow along.  It will drive traffic into your virtual blogspace, win win!

fleekingperiwinklefleekingperiwinkleonpoint

Wouldn’t it be fun to come up with a new word of the day for others to use in their blog? I am suprised there is no such linky party.  Gotta love the quilty linky parties!

I am a thrift store comber.  Weekly I drop by at least one store to see if there is something that I would use or need.  This week I was lucky enough to find 3/8 inch bias.  Bias of this nature is perfect for making a chenille quilt.  This pink stuff will be turned into a flower motif on a quilt top one of these days.  I cannot remember if I found 5 or 6 rolls. Brand new these sold in the 70s for 6 bucks.  Today If I were to buy this it would cost me closer to 15 for one roll.  And no I did not spend $2 a piece on them, that is still too high considering their age.  A buck each was the magic number. The pattern on the back tells you how many are needed to crochet into a sweater.  Neat concept, but will never do that.

bias

Not much to write about on the home front.  The days are getting shorter, and signs of autumn are in the leaves.  The dryer is finally fixed.  The tire pressure monitors installed, they now read the correct air pressure.

I suppose I do have some news, I lost a hubcap yesterday.  I heard the pastic lugnut go (2days ago there were only two lugnuts holding on the hubcap) and then the plastic hubcap I am positive it made a noise when it exited the ride.  I will look for it Monday in my commute as I made a mental note of the noise and where I was when it occurred, I was in the boonies before the sun was up.  My car will probably start nickle and diming me as it is now more than 12 years old.  But it beats a car payment.  I always said I would drive it till the wheels fall off, do hubcaps count?


Dew Point ~ And pressing on a wool mat with starch

SUNSHINE!  They rays are beautiful today.  And it’s about time for mother nature to cooperate on a Saturday!  Still no completed photos of Postage Sheet.  The ground is so spongey that it would make a mess of the quilt let alone tracking in more wetness into the house.  More than 4 weeks of torential rains, it raining every day for the past 2 weeks, this is a much needed respit.  Photos will come.  I need to seek out a photo opp on concrete.


Imagine you have a wash rag hanging on the clothes line, and it rains and rains and rains.  Because the volume of water the wash rag can hold, no matter how many inches of rain, it will dry in the same amount of time if it only rained an inch.  The ground is different.  My house is definately different that a wash rag in size and volume.

My home was built during WWII.  It was housing to shelter the United States Air Force Trainees in our little bitty town.  So if you do the math, my house is old, made of wood on a pier and beam foundation.  Because of rations at that time, the center from stud to stud is Greater than 16 inches….close to 20.  Anyway, the wood, as old as it is likes to suck up moisture.  The pier and beam foundation also sucks up water.  Today the temperature in the house vs. outside was significantly different.  So, the moisture level is becoming dew in the house.  Mainly on the floors.  When you walk, your feet are wet if you are barefoot.  If wearing sneakers, they squeek with every step.  This probably happens every morning, but not to this severity.  The floor was just as wet inside as the concrete on the porch outside.  The house reached its dewpoint.  Thankfully it is not raining in my house, as this used to happen at my dad’s shop.  Humid weather, dry cold air mass hitting warmth, it would rain from the ceiling on the prettiest blue sky days.  I suppose it would be called a dense fog at foot level.  The windows and doors are open.  The fans are running even though it is not hot.  Hopefully be the end of the day, enough moisture will burn off for this not to happen again short term.  I refuse to look at the weather forcast.  If the rock is wet, it is raining.  If it is white, it is snowing.

I have put away the jacks chain circles project.  The table I work from is not big enough to work the top and the coming together of the blocks.  It will happen, just not now.

jackscirclerings

I have been enjoying a couple blocks worth of stitching each night on the periwinkle blocks.

tutorial13

If you are interested in this block, it is not hard.  I have a free tutorial on my last post, check that out here.  In the pressing of each 1/4 of the block, the first seam press towards solid.  The next seam press towards the print.  Make sure when you feed the blocks through your machine, the wrong side that is up, the seam should be pressed towards the needle.  The other half of the block, the seam will not fight the feed dogs and will be pressed towards you.  This enables nested seams that will NOT scootch causing points/seams not to match.  The photo above is one snapped in a “Non-cheese fabric play moment”.  I am wiser now.

I had a stack to carry to the ironing mat this morning.  I did not prestarch my fabrics.  They are all fingerpressed at this point, but flimsy with no starch support.  I think of starch as a good stiff bra.  You wish you could go with naught, or with lacey and flimsy, but at the end of the day, this would be exhausting.  Going with stiffness/firmness helps hug ‘em all day keeping your energy and attitude better, more even keel with less wrinkles in life, ya know?

So I misted all my finger pressed blocks with starch.  Make sure not to do this step on your mat.  I recommend doing that on the ironing board.  I am one of those people who is just too impatient to wait for the starch to dry.  I press while wet.  I did not want to lay wet blocks on my expensive wool mat.  I have seen what starch does to my ironing board cover.  It carmelizes the starch.  I do not want to cook sugar on my pressing mat as there is no way to wash.  So instead, I laid a paper towel on my mat, placed the wet/starched block on mat, and pressed my block.  If any starch seeped, it was into the paper towel, not the mat.

I have a Rowenta iron.  OMG……it is now 12 years old.  The skid plate is made out of a chrome like plated piece of metal.  When clean it glides over fabric like there is nothing there.  When it is dirty, it drags and does not have good heat transfer.  How do I clean my iron?  Simple.  When the iron is off and cool to the touch, I carry it over to the kitchen counter, near the edge of the sink, and using a damp Magic Eraser (found in the cleaning aisle at the grocery store), I gently rub the brown starch carmelization away.  It probably takes less than 2 minutes.  Would this work with all irons?  No.  If you have a teflon or coated skid plate, all the carmelization is left in your fabric (which is kind of icky, but we quilters make do with what we have).  If you can see built up on your iron, it is probably time to clean your iron, it will now do a better job too.

On a completely different, but natural note, this area has been hit hard by the twig girdler bug.  I know, I had never heard of this before.  When the rains started, we had army worms, and I noticed in my driving around it looked like a storm had come through some areas.  Noticeably, it was small limbs down under trees.  At first I thought it was squirrels gathering branches for nests.  But all the limbs were the same size, almost perfectly.  In listening to a local radio program, the county extension agent said it was called the twig girdler bug.  Upon these fallen branches, if you pick up the limb and it is rounded off instead of broken off from the tree, you have these bugs.  These bugs lay eggs on the portion of the branch that falls for these to remain close by until the next breakout.  It was warned to burn the branches to ensure proper eradication, but in all likely hood they were still in the trees.  I was excited that I learned something knew, and came home to look it up on the internet.  These bugs perfectly lumberjack their way and saw off the branches very cleanly.  Nature is amazing, and you cannot believe how many trees I have seen with this problem.  I doubt the owners of these trees even could dream this up, and it will probably never be questioned, other than wind or storms.  Curious what the heck I am talking about?  Go here to wikipedia and learn more.  A picture is worth a thousand words, so here you are.

iu.jpg
This picture is compliments of a 4H resources and here is the actual link with more details.

In summary, I have given a link with good instructions to make the periwinkle or hummingbird block.  I have also discussed a pressing issue (HA) of wet starch on a wool mat.   I have given you a hint on cleaning your iron.  And lastly, I have even introduced you to a local pest, though fascinating, still a nuisance.  My goal here is knowledge.  Passing on what I know to those who may not.  Knowledge is power, even if it is in the hobby room!

May your weekend be in stitches!  And thank you for reading my blog!

Periwinkle Quilt Block Tutorial

I received a gift a while back.  It was dropped in my order from MSQC.  A small template that I had no notion of using, but I hung on to it.  I started brainstorming on this device and vowed I would never foundation piece the block, but how would I accomplish the same results.  I have the mini wacky web template, but you could also do this with the larger version.  You will have to upsize your cuts.

The first thing I did was compare the mini wacky web template to a regular square.  Such a funny angle, and I am angle-ly challenged.  So after doing so I realized that one corner of this is a 90 degrees, a corner of a square.  measurement1

I broke open a long over due jelly roll strip set by Kaffe Fasset to play with this idea.

tutorial1

You will either need 2 1/2 strips or 2 1/2 mini charms to proceed with this part of the periwinkle.

tutorial2

Next I chose a solid jelly roll which was an earth tone that would go with these prints.  You will cut your fabric into strips 2 1/2 inches by length of fabric and then trim those sections to 3 1/4 inches.  For each print periwinkle, you will need two solids.

tutorial3

Then with right sides together, stitch periwinkle to solid.  Notice there is over hang on the larger edge.  This is crucial for an accurate block.  Also notice the smallest part of the periwinkle and how it is situated on the solid.

tutorial4

Finger press (I am still working out how to press the seams)  It is best to press the seams open.  For this tutorial, I pressed outward toward the solid.

tutorial5

Repeat for the second side.

tutorial6

Crucial to finger press again, this time pressing towards the print.  Finger pressing is optimal because you have funny angles and bias edges.  After finger pressing, I wait until the entire block is finished before I press my iron on it.  I do not iron it, I press.

tutorial7

Here we have 1/4 of the block finished minus the trimming.  This is the same concept as their paper method without the paper.  Notice the periwinkle print nests perfectly into the 90 degree corner of the square.  Carefully align to that corner and trim the solid overhang.

tutorial8

Now isn’t this an odd shaped critter?  One more cut to make.  Here is where you will use the angle built into your ruler.  Align the 45 degree lines that bisect over the periwinkle 90 degree corner.  See below?

tutorial9

How does this work.  A straight line is 180 degrees.  A corner of a square is 90.  Two 90 degrees make 180 if you add them.  So if you have two 45 degree lines, those added together equal 90 degrees.  Too much math, ignore that last couple of sentences and just study the picture.  Now on the two solids that are overhanging the ruler, you will trim that with the straight edge.

tutorial10

You will need to make 3 more blocks just like this shape.  Prints/solids may vary as you are creating your own quilt.

tutorial11

Using a pair of periwinkles, stitch, nesting seams and matching raw edges  It may be helpful to pin!

tutorial12

Finger press your seams as you go.  This block is almost done.  Now stitch your pair of pieces together.  And voila…..a periwinkle block.  Trim your dogs ears from the 4 solid corners.  Treat this as a 4 patch block.  Open your seams and spin them, with finger pressing first, iron pressing last.

tutorial13

Notice that my seams are not matching perfectly. This block was my first.  I figured out pressing after this snapshot.    Also, because of weird angles, you want to use an accurate 1/4 inch seam allowance.  This means, find your 1/4 inch mark, and go a thread shallower.  When pressed, the thickness of the thread will achieve the perfect 1/4 inch.  Now is where I carry this to my ironing board and press.  If you have a pressing mat, that is perfect after finger pressing.  You will be amazed at the non-distortion and accuracy in all your blocks.

Have questions?  Did I leave something out?  Did I leave something vague?  Comment and I will gladly edit/add/comment on what is needed to help you through achieving the periwinkle block with no foundation papers!

I hope this inspires you to use some of the precuts/scraps in your stash!

Did you catch my post on the other blog?  If not click here to visit, or click here for the recipe of pumpkin pancakes.

Linking up with the 2018 Tips and Tricks tutorial festival.

Enjoy your week!  Sew on!

Postage Sheet!

My excitement ensues to the countdown until I get my longarm!  In the process of ready-ing for the event, the ufo pile is going to get worked to it’s death or near death as I have much progress on these and they just need solutions to keep going.  One baby step at a time with no rush or hurry.

A few posts back I brought out the stars with embroidered blocks.  I am still at a stoppage, and think the solution may be to digitally scan the block and upload it to Spoonflower and print replicas of the block.  I think that would get the right color white and match the pattern/design where I can fussy cut and square out the quilt as it is on point.  What are your thoughts?  Have any of you done this?  This is an expensive option and will be my last resort.  Hopefully there will be a suggestion or idea that I see as it stores perfectly in it’s tote until that time.

or on point

And I started figuring out how to stitch my dodecagon blocks called Jack’s Chain Circles.  There are no free directions out there for pressing.  I think the way to go was to press the seams open on the blocks.  I have figured out how to join the blocks and it is working fine.

jacksringcircles2

I sew the blocks together and make sure not to catch the existing seams in the new seam I am making.  I fold them back out of the way and stitch 1/4 from the start.  Then when I place the triangle in, all the funny angles are already stitched at junctions that allow the last 1/4 seam to be added perfectly.  There is a lot of thread waste using this method, and this quilt was probably meant for paper piecing in the past.  This is working for me.  I made a grandmothers flower garden quilt years ago and stopped short of the 1/4 point for all the hexagons, and I still have the quilt with no ill effects of the wait and see how it turns out method.

I have about this many blocks together (as pictured).  Now I have a a brief intermission!  The quilt I sent off on July 12th for quilting services at MSQC has finally made it’s way home.  They do outstanding work.  This is the quilt I feared giving to my LAQ as it has bulky seams with the interfacing method of patchwork.  I knew if I sent it to the pro’s they would do an outstanding job.  This was sent off before I decided to buy a longarm.  It was expensive but you pay for quality.  I am very pleased with how it turned out.  This is a postage stamp quilt, and since I made it out of vintage sheets, I am calling it Postage Sheet.

sheetedborder1sheetedborder2

These photos were taken during the piecing.  At this stage it is not quite finished.  My camera started malfunctioning and it was hard to get a good pic.  The backing of the quilt I picked up at an estate sale and is a vintage sheet.  I also have matching pillow cases.  I think the sheets were brand new out of the package and never used.  The white backing really softened it up even more with pastel goodness.

postagesheet1
You can see the white sheet backing here.  There is a band of pink florals at one end of the sheet.  Made a lovely backing, and 100 percent cotton (it could be linen not sure).

postagesheet2

I make many quilts, and I have a loved one in my life that doesn’t say much about my creations.  When this one was taken out of the package to view the quilting job, he said I should put this one up as it is probably the prettiest one I have made.  The ultimate compliment from one who never gives them.  🙂

Right now I am binding it and can’t wait to show you!  It is forecast to rain all weekend and a good part of next week.  I bet I get this one finished purty quick as it has become that time of year again.  I will have to wait until the earth dries out before I can get a good photo opp.  But, snuggly weather is coming…..I have been waiting for this for so long.

To wrap today up I will be making pumpkin pancakes, a recipe my daughter picked out that we will be trying.  Doesn’t that sound delicious?  Please check my other blog (thecookbookproject.wordpress.com) for that post.  There are other recipes already there, so check them out!

I would like to take the time to thank you for being the wind in my sails.  If it wasn’t for you readers/followers I am not sure I would continue with this extra little effort.  I kindly thank you for any comments or suggestions.  I enjoy reading those sew much!  Have a great weekend!

True Treat For October

Today was the day I got to visit the Piecemakers of Fannin, County Texas.  A friendly, knowledgable group of quilters/crafters/sewists.  And I got to teach all of them how to make a toothbrush rug during their retreat, the true treat for October.  I promised I would post links of how to start, how to tear fabric for perfect, or imperfect 2 inch strips for the rug.  We discussed what would make a good needle, or toothbrush device to weave your rug.  It was a blast!

I have never purchased a pattern, and like to figure things out on my own, sometimes winging it as I go, sometimes perfect, sometimes, rip and repeat.  A toothbrush rug is very forgiving.  For Pete’s sake it is just a rug, to cushion the feet, to keep the dirt at bay, to decorate, and to take the wear and tear.

How does one start?  If you are interested in this, I recommend going to this site.  Click on the link and it will show you exactly what I showed today to get a start on the toothbrush rug.

A couple of perfect images there showing you how to make those first few stitches.

Here are videos of Aunty Phyllis rug maker herself, showing how to make the knot stitch.

Click here

Here

And here

If you are a written instruction kind of person, you can go here for those.  My second go round of making rugs came from this site.

This is the start of a hot air ballon, 1970s panel of cotton/poly blend panel that is definitely a blast from the past.  Rugs are an excellent way to use up panels that have stuffed animals cut outs, pillow panels, and other fabrics that you cannot quite figure out how to use in other projects.  You can really move much from your stash as one rug may take upwards of 10 yards.  The larger the rug, the more it will take.  The rugs in the videos are nice a scrappy, just how I like it, Crap with an S.

retreattoothrushrug

There is nice variety in the panel that was used in the start of this rug, all of the different colors broken up, to not be so orange, or brown, and nice to see a tad of country blue in there too.

When I arrived at retreat the yard was full of Red Spider Lilies, these are also called Hurricane Lilies.  In Sept in our neck of the woods these come up volunteer.  I suppose there is an algorithm in what it means for winter and fall.  I have not looked that up, but I would say this year was a bumper crop.

redspiderlillyredspiderlilly2redspiderlilly3

Fireworks in petals, vibrant reds, naturally perfect!

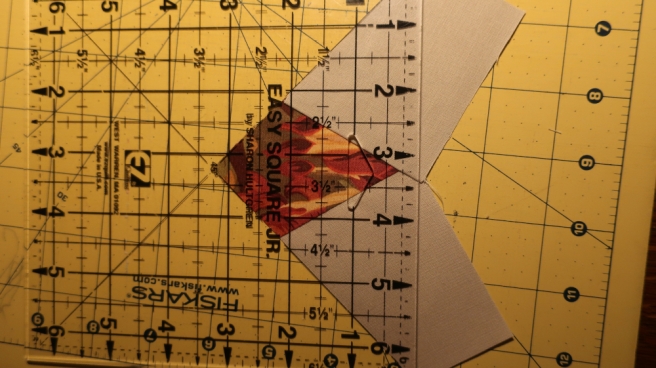
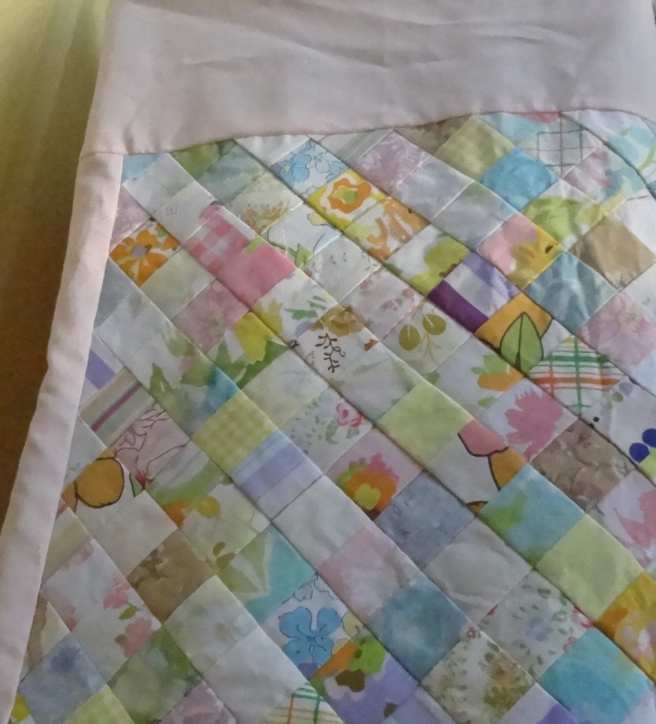
Here is just a glimpse of what other retreaters were working on.  I did not take that many photos and wish I would have taken more.

irmasquiltembroideryteatowelsinapickelembroideryirisirissingle

And a bonus, these ladies so graciously gave me calendars, quilting magazines, a quilting template, a nice spool of 100% cotton thread, some Halloween fabric, in a lovely shopping bag and I am just in awe of their generosity!  These gals really know how to pay it forward, something I try to do and the older I get, the more I see results from this.  A heart happy event, and nice to know people are still good and genuine.  🙂

As we left, at the end of the property on the other side of the fence stood an old (I believe) oak tree.  This trees base was odd, it looked like it grew up and around something.  I cannot quite explain it.  I thought this old tree needed a face as I could see Old Man Tree staring back at me.  It looked like he had a story to tell, and I would love to listen.

oldtreemantreegrowth

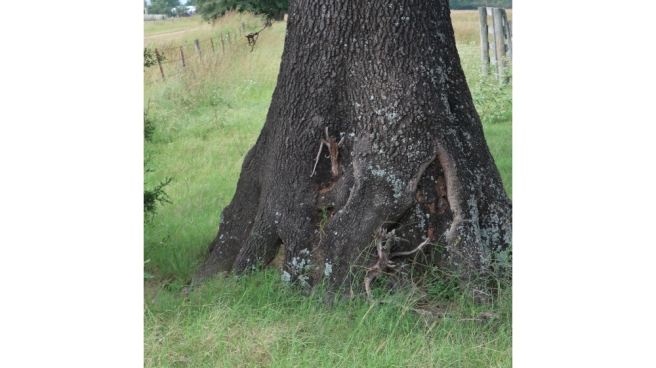
See what I mean, peculiar, but interesting!

For those of you that read my blog and were at the retreat, it was splendid, and I enjoyed it!  I felt very comfortable amongst you, and would like to thank you for such a pieceful day!  Being out in the boonies is a lovely place to be!

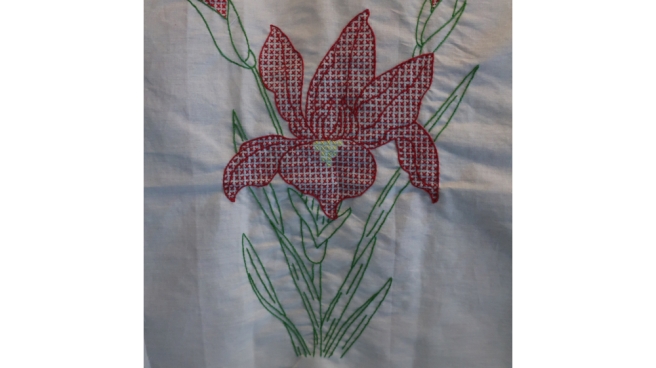
Onto sewing blocks…..in last weeks weeks post, I came to a standstill with this quilt.  or on point

A trip to the quilt store, I found a piece of ombre fabric of blues and turquoise.  It was too much drama for this serenity.  I may scan the embroidered block and upload it to spoonflower.  That is expensive and back into the tote it goes until I think of a solution, or see a solution.

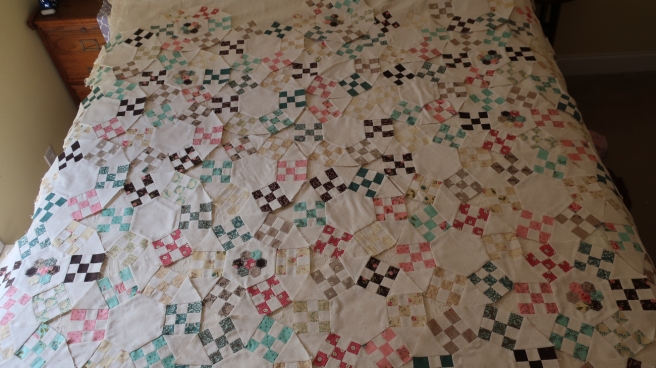
Another UFO out of the box, stitching along things going smoothly.  I have 36 blocks done which is enough for a quilt.  I have laid it on the bed, and The Jack’s Chain Circles really show up on camera, not sew much in person.  The block is call Jack’s Chain.  It involves Y seams and is an advanced pattern.  If you are interested in making this block full of challenges visit Marcia Hohns Free Patterns page, or just browse quilterscache.com for a plethora of ideas….all free!

jackscircleringsjacksringcircles2

I am off to cook supper.  Not exactly sure what, but it will happen.  Do you like to cook or collect recipes?  Visit my other blog thecookbookproject.wordpress.com for some delicious eating!  Thanks for visiting and reading my blog!