Lazer Light Show

Did you catch me live? No worries if you didn’t. Here is the replay. I was at the longarm quilting this.

I basically explain my thought process on how I came up with the quilting design on this quilt. Some free motion and some ruler work. One baby quilt, done!

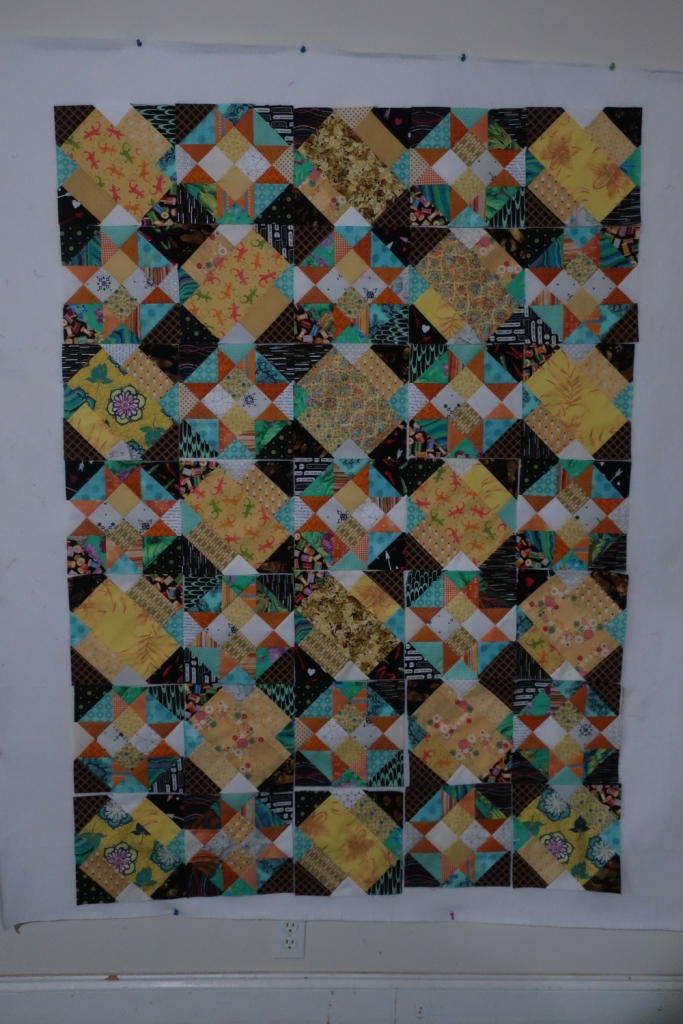
And then last week I also got some feathered star blocks completed. This too will be a baby quilt for someone. I came up with a simple border idea.

And in case you missed that live you can see it in the replay.

The first 4 minutes is me rambling and a dark screen. Oops the lens cap was on!!! I can laugh at myself, but gosh people must think I am an idiot!!!!

So instead of sewing my blocks together I came up with the idea of making a border and attaching it to each block in the opposite color of the block. I have one strip to complete and this will be a quilt top in no time. I have retired that accuquilt die for now. I will revisit it when I can go with a similar color scheme as the pattern is written.

I speak a bit of this in my video. I am not going to lie, but because I used a garment in the making of the memory quilt. The whole kit and caboodle was not square. My first thought was I would square it up with my lockers and stitch my cut lines. But I had purchased this inexpensive lazer level to trim my quilt corners and make everything truly square. I am happy to report, that the memory quilt was the squarest corner I have ever made and cut after the fact. Normally the ruler goes wonky and I have to make due with a line that veers. This worked peachy!

Because that quilt top was black, I opted not to photograph, but you basically lay this out on your cutting table at the corner you want to square. The line will run down the whole side of your quilt. You may have to actually use the floor for bigger quilts. It worked marvelously.

Most husbands have something like this in their tool box. Take it for a spin, I think I purchased this one on amazon for less than $15. That folks is cheaper than an acrylic ruler!

And now I will be thinking of another baby quilt build. I am not certain if I will go in this direction, nor what colors I will select. I am thinking FGV2.

Upcoming on the longarm will be one of three quilts. I have my jack’s chain. My mother has a very pretty dresden. And I was actually contacted by a fellow quilter to quilt her Alaska row by row. Not sure which one of these will make it on there next. The alaska quilt needs a backing. I have not reached out to her to see if she has acquired it yet. And Mom’s quilt needs a backing too. I need to sew the backing for the jack’s chain. It appears to be a race of backings at the moment. hahahahaha

I aim to get back to my pillow case lace.

I have curved this lace to get it all in the picture. But it is made as straight lace. I have it stacked the motifs on one another in the picture below.

I have signed up and will be taking training to become a county fair judge for textiles and photography. I am excited to learn about this process. And I am hoping the photography aspect of it helps me with this very blog. Plus it will help me get out of this house and see some quilts, and a carnival to boot. Maybe some cotton candy tasting. Gosh it has been years, but sounds delish!

In the meantime, I need to get stitchin’!

Thanks for stopping by and reading my blog!

Small Steps towards ???

If you read my last post, my longarm broke. It was a simple repair. I am now a longarm technician as I fixed it myself without instructions, just small baby steps to figure it all out.

I made a video to assist those who have my brand longarm, if this part ever breaks on them, they have this video as a reference as the manufacturer has NO INSTRUCTIONS or VIDEOS anywhere on the net.

I lacked a few passes of work to get the quilt top shown in the above photo done. So I ensured while stitching this one out, that it worked and all was well again with the machine. The octagon quilt is done. I will bind this later when I am not in a pinch.

And so the memory quilt will make it to the longarm very soon.

I now have all the new pieces added all appliqued down. I am going to line this polyester quilt with muslin to help prevent bearding. I am brainstorming on a quilting motif. I am thinking linear lines that follow the rays with bubbles quilting to add to the texture in the negative space. I am to start this in the coming week. Baby steps and you get to where you want to be.

And a while back Accuquilt introduced the feathered star die. This block has been on my bucket list for years, but the difficulting of cutting this puppy out made me turn my cheek and opt out of the idea. Well, anything that will assist cutting a difficult block with weird angles precisely is worth a try.

Soapbox/advice with this particular BOB die (block on board). This block the cutting is easy. However, the instructions provided with the die, do not tell you how many pieces to cut out for a block like mine above. The pattern they provide is for 3 and 4 color blocks, so you have lots of figuring out to do since you are only doing two colors. I had a bunch of seam ripping. Ultimately I got there in baby steps. Very easy to get turned around with this since there are so many weird angles. And it has a Y seam. So ease of cutting makes up for the difficulty of construction I guess. I would say of all the blocks I have ever done in my entire life, this is by far the most difficult to set together and get it right.

When using this die, I cut 9 1/2 inch strip wof to pass through the machine of both colors. What the pattern does not tell you and what is not obvious, the die has two small squares that are different sizes. There are also the perimeter HST pieces that also have two different sizes. So, if you construct this, make sure you use your alphabities to keep things straight.

The picture below is the opposite of the first one I sewed. This also added difficulty because you are copying the block you just did in the opposite. So even on the second block there was some seam ripping because I would get turned around a little lost. I even laid out the pieces on my design wall to keep them straight.

There is a particular order you have to sew the block in, NO DEVIATION or the block will not come out to the right size. Above is the Y seam I was speaking of. Because of the funny tips on the star, those on the bottom row and top row can be sewn without Y seams, but the middle row with different sized pieces HAS to be sewn in a Y seam. I do not recommend this block for those of you who are beginners or intermediates. If you are a beginner or intermediate you will need to just use a similar colorway with the diagram they give. And to all skill levels you HAVE TO FOLLOW THE INSTRUCTIONS precisely.

This will become 4 squares in total and a baby quilt with a simple border of the same color solids. It is a beautiful block, but it BITES!

And a couple of months ago Tilda’sworld.com offered a free pattern that had me swooning as soon as I saw it on the website. And before anyone posted about this on instagram I wanted to do it. But I have TOOOOO many projects going to start it. Well now that some of those projects are a bit better controlled I will be able to start cutting my fabric pull into 2 inch square to use as a leader ended. Although I am tempted to use the grid interfacing to make this work even faster. Some of my colors are not solids, but to think of going and purchasing more fabric when I have the fabric that same color just in a print sounded ridiculous to me. So I shopped the stash and really toiled over a couple of these prints not being close enough. But, I am not totally decided and after the fabric pull I have not determined if I even have enough of some of these smaller scraps.

This is called Tilda’s Embroidery Flowers Quilt because it resembles a needlework design.

Stunning isn’t it? I do not have background fabric this color so I may opt to go with a white. Black would be beautiful. That part I am undecided about. A dark green would be marvelous too. I think you can purchase the quilt kit right now with or without interfacing.

And last Saturday I went live on youtube. I will be doing this again and hopefully next time in a more primetime slot. I am debating either a Saturday night or a Tuesday night.

As I write this it is very warm in the house. It is that time of year again when the nights are not that cool, so during the heat of the day, the house temperature rises to a “too warm” level. It makes you not want to do chores and be lazy. The humidity sucks the energy right out of you.

Wish me luck at staying energized! And thanks for reading my blog!

The Longarm is Broken

This title probably sounds worse than it is. I sent a text to my son telling him I would not see him in the morning at work because my longarm is broken. He was just waking up and read it as I broke my arm! Thank goodness THAT did not happen! So, like I said, it is not as bad as it could be.

The tension spring broke.

I have about two passes left and this will be done. When my last bobbin ran out, I did my normal routine by winding a new bobbin and threading my machine by pulling the thread through, because it is already threaded. That’s another post all together.

When I started quilting, I always start on the edge of the quilt (which will be hidden in the binding edge in case my tension is not good..) Everything seemed fine. I moved to the center of the quilt where the bobbin ran out, and after a few stitches, the machine sounded different, had different drag. I stopped, checked the tension on the bottom. All was good and I proceeded to continue quilting. What I did not know, the tension spring completely broke off.

There are no repair videos out there to replace it. My machine has about 5 months left before the warranty is out, but without even asking, I don’t think the spring is covered because this is something that is made to wear out. I can go back to the manufacturer and purchase one for less than $10 and then pay to have it shipped and be down for a week or more. Or I can trudge myself to the big city and locate one there through a longarm parts specialists. It seems there is may cost around $5. Or I could order it online and spend gobs of money to have it shipped 45 miles.

And the urgency to get this fixed is REAL. I was planning on having the 60 degree stars quilt off the frame this weekend so I can get back to this and quilt it up.

Last week you can really tell that spring has sprung. We have new kittens. And I have never seen newborn kittens responsibility to be shared within two days of being born to another mother!

And for fun this weekend, I decided to try my hand at Indigo dying. It was fun and I will do it again. I learned much and look forward to this process again soon!

I decided to do some random stuff. The balloon experiment was a great success, so were the glass furniture coasters. The binding clips were neat on the edges, but really not much to write home about in the folds.
Even the stir stick turned out neat!
In the speed queen they go.
And here they are nicely pressed and folded. I used my kona white and my unbleached muslin. In the end, it did not matter which one I used, they both worked.

I went live on my youtube channel. And I was not alone! Yay! If you missed the live you can always go back and watch it after the fact.

I presume I will be posting a repair video for my longarm and will learn this as I go and video it, so I can go back and make sure I have re-assembled it correctly according to how I took it apart.

Wish me luck! And thanks for reading my blog!

Scrappy Friendship Star Free Pattern

While making this, I just made up my own pattern for the friendship stars. This block will have a finished measurement of 6 inches, and 6 1/2 inches unfinished. I have drawn up a pattern and am giving it away for free.

If the slide show does not work for you, I am giving an alternate option. You can download/print the free pattern.

I will be scheduling a youtube live event, Saturday April 16th. The time slot has not been scheduled yet, but it will be early around 7 or 8 a.m. central standard time. Grab your scraps and chat with us Saturday and learn how to make this easy beautiful block. Click here to go to my youtube channel. Don’t forget to subscribe and like my videos. And hit the bell so you don’t forget when I go live.

And so it happens to be so very close to the middle of the month, I am going to wrap this scrappy post with the scrap happy post too. Please click through all these links for additional scrap happy posts.

Kate, Gun, Eva, Sue, Lynn, Lynda,
Birthe, Turid, Susan, Cathy,  Tracy, Jill,
Claire, Jan, Moira, Sandra, Chris, Alys,
Claire, Jean, Jon, Dawn, Jule, Gwen,
Bekki, Sunny, Kjerstin, Sue L, Vera,
Nanette, Ann, Dawn 2, Bear, Carol,
Preeti, Edith, Debbierose and Esther

And have you heard?

I have also joined the 2023 scrap-a-thon. Why not? I sew so many scraps I might as well vibe with a tribe. Visit @daybrookdesigns or @letsquiltalong for more details and sign up. My calendar is filling up. My project cup runneth over.

This is now quilted. This was a free mystery quilt. Here is my version, and here is my mom’s version.

I have been tatting away on my pillowcase lace, which is now triple this length.

I have this loaded on the frame and am quilting straight lines in the stars and a wavy grid in the neutral zones.

This is back on the design wall to add some more circles. Wish me luck, I have a lot on my plate! Thanks for stopping by and reading my blog.

The links for the video

Here is the link for the free basket block pattern.

Here is the link for the free charming hearts pattern.

Here is the free key fob pattern. This pattern was originally in the open gates quilt box in march. I found the pattern free on the sallie tomato site.

Here is the memory quilt I am working on.

Here is the Rob Appel Video where I got the inspiration.
Here is the link to the free pattern by Kathryn Kerr for the 365 quilt block challenge.

And here is the tatting pillow case lace I am working.

There is a freebie with this also. Joelle gives this on her youtube channel. So if you know how to tat, her channel is supreme! She also has a blog

I hope this blog give you inspiration and the video helps assist with that as well.

Thanks for reading my blog.