Well, I zipped right through this project! Very pleased with how it turned out.
The pattern colors I disagree with at the purple flower. I wish all of that flower was a little more cohesive. (The dangers of pattern following LOL).
Now, how to quilt this?
How should I quilt this, fellow quilters? At first I though the whole thing should get a lattice cross hatch all over, but that would be like placing an X through every square, which I though would be very cancelling. I want to custom quilt this. And idea? Please comment below with all your ideas. Whatever comes to mind would be considered.
The trouble with this quilt? It photographs marvelously about 6ft away. When you are close up, the design is lost. This makes it much harder to quilt. The pattern calls for very modern quilting which is just lines about very half inch all going from left to right across the design. I may have to go with this concept if a good idea is not brainstormed. I googled this design and apparently those who have quilted this have not shared on social media. ????? Why?????? This is the personal spin that each maker can put on this quilt. I really do not want to go with a panto. I think that would take away from it.
The hard part of this quilt, was not the 40 plus color fabric pull from the stash, nor was it the cutting of all 2000 plus squares (I usually deem cutting as the hardest part of the project). The ironing was the hottest part of this project just because it is extremely hot here in Texas. The sewing part was pretty easy. It did get a bit tricky because those panel pieces were so stiff. Quite a bit of wrangling going on!
I would love to hear from you, please leave your feedback in the comment section below!
Folks, due to a busy flurry of activity, my blog post is short. I bothered to take some photos and made a vlog from it. For those of you who do not want tips with using grid interfacing, you can just look at my progress in a week!
And if you want the deets on this style of sewing your squares, you can check out my video blog.
I did make a change to the pattern. Where the dark squares were called out that complimented the background fabric, I opted to do the same with mine, but I had to select a lighter color than chosen in the pattern but, obviously it had to be complimentary to my background. Can you see the subtle square color? I probably could have assigned all of those as the back ground color because it makes no difference in the pattern.
And I found out that I ran out of color 11 which was a very light pink. So I went to my 2 inch scrap box, and found about 10 more squares. And ran out of those. So color 11 has many colors and adds to the scrappy-ness I guess.
Bushels of scraps? Plant those scrappy seeds and make a quilt! I have been sewing from the stash and am happy to report, many scraps have been removed from the pile, yet the pile is still just as big as before. It is scrap happy time again where all of us link one another so we can share all the scrappy love going on. Please visit the links below and delve into their scrap happy!
In the past month, I have completed a scrappy quilt top.
I have started a new baby quilt called milk cows and milk jugs (this makes me giggle). And a tractor and trailer are planned to make very soon to add to this as well as some crop blocks. Just look how high the alphabet got!
And finally, the biggest scrap buster, the embroidery flower quilt which is a free pattern here.
Weeks ago I cut all these squares. And waited for the bolt of grid interfacing arrive. Unfortunately, they sent the grid on point, not what I ordered which was the normal grid. We reordered the exact same thing. I said it would ship by the 14 of May. The 20th of May came and we decided to cancel that order because we placed it on the 3rd and it had not yet shipped. So we reordered, this time from Walmart, and it finally arrived. Seems like lately customer service is dead, and the minions doing the work have become increasingly lazy. Have any of you noticed this?
So while cutting these squares, I consider cutting and starching the biggest part of the job. Although it is not all behind me. The pattern called for over 3000 background squares. I refused to cut that many. I did cut a baggie full. The rest of the back ground will utilize larger strips. This will not save me any fabric, just time.
Opting for larger pieces does not change the form fit or function of using this interfacing grid. Ladies and gents, do you have a favorite cross stitch pattern? You can easily turn it into a quilt pattern with squares.
And I am certain you would like to see some panels that are done for this embroidery flower quilt.
These panels come together in the form of a oblong 9 patch. There are 9 panels to iron and stitch. I have 4 panels ironed, and 2 completely stitched. I am doing these in random order so, their picture as a whole will not come together until I have the ones out of sync done.
If you are curious about this process I have uploaded a video on youtube.
As you can see above, the background really makes a big difference in how this is going to turn out. Wish me luck! I hope my fabric picker is not broken!
I am participating in the #Scrapathon2023. It is a self paced sew of your scraps. I wonder how many I will complete? I think I am off to a good start!
And a couple of other videos happened. I needed to clean my iron and I always hear people asking how to clean your iron. So I made a video. I hope this helps all of you at some point. Keep in mind this is for base plates that can be cleaned. Do not use this routine on Teflon coated irons.
And some body in the house spilled something (I think it was Ramen soup) on my pressing mat. My mat is an early mat, so it is made very well. (I purchased a new one in case cleaning my mat was unsuccessful and that new mat feels cheap and is not as thick). I had also been starching using the mat. I will refrain from doing that because it builds up on the mat and then over time it caramelizes your wool mat. I wish I had taken a before an after photo, but the brown build up vanished.
The mat took several days to dry. 75% dry from hanging on the line. I had to bring it in because rain was forecasted. The remainder took a couple more days on the drying rack.
And while I daydream about quilting things (usually when I am at work), my mind is made up to make a jacket. I watch Mom and Pop Quilt Shop on youtube and Laura Lynn made a lovely bag all out of various sized HSTs. While I was digging in the stash for a backing, I came across several instances where I had saved HSTs. I went ahead and put them all in one spot and will continue saving until I have more than enough for a jacket.
I have been selected this year for our annual quilt hop in town to do a demonstration. I am excited about that, but it is not until late July.
Summer arrived yesterday and we almost hit 100 degrees. It has been very pleasant so far this year. I hope the heat leaves the area. This may be a long, hot, summer.
My sewing anxiously awaits me…..thanks for stopping by and reading my blog!
Due to a longer weekend last weekend, I got a gob of stuff done. Mom’s Dresden is quilted. Turned out beautiful.
And I got this one quilted, sorry no quilted photo.
I made a chicken pincushion.
And I started piecing a new baby quilt. I had just received my copy of Farm Girl Vintage 2 and skimmed through it, and then got out the Farm Girl Vintage book to plan on making a barn quilt out of 2. I changed my mind and enjoyed piecing a cow block. And what goes with cows? Milk Cans of course. I hope the mom to be is not offended by this theme. It is cute, but you never know eh?
This picture is the bom cut out of all the pieces for the larger cow.
This block sure has a high alphabet count!
And just like that it turned into this.
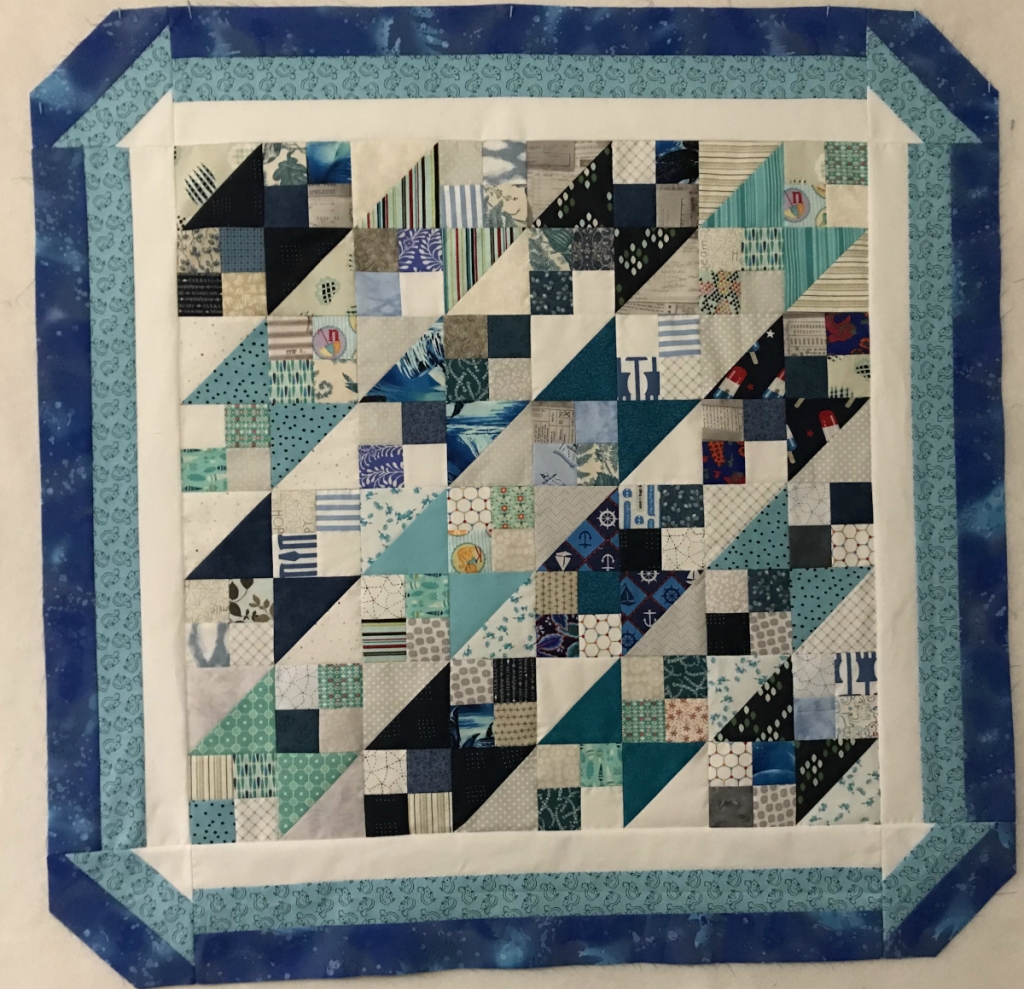
And I got borders put on the blue boy quilt top. All this is, three 2 1/2 inch strips sewn and trimmed to each side. Each side had a left over 10 inch or so piece. I turned my 6.5 square on the strip set on it’s diagonal and made each corner. Looks like a fancy churn dash (which was unexpected). Love, Love, Love how this one turned out. Sometimes the fun of just winging a quilt design has a wonderful outcome. #Scrapathon2023 And who says that a quilt needs 90 degree corners. I rather like this design element.
The weather is still cooler than normal so hopefully I will get the blue quilt quilted soon. Other stuff on my to-do list, I have a couple of bindings to install, but there is no rush.
I also got this sent off to see if it will make the cut in a quilt show. I have a little more work to do on this. The binding is complete, there are quilting stitches that need ripping out. I need to install a sleeve as well as a label. I have plenty of time to do all this, but the ripping out is very time consuming.