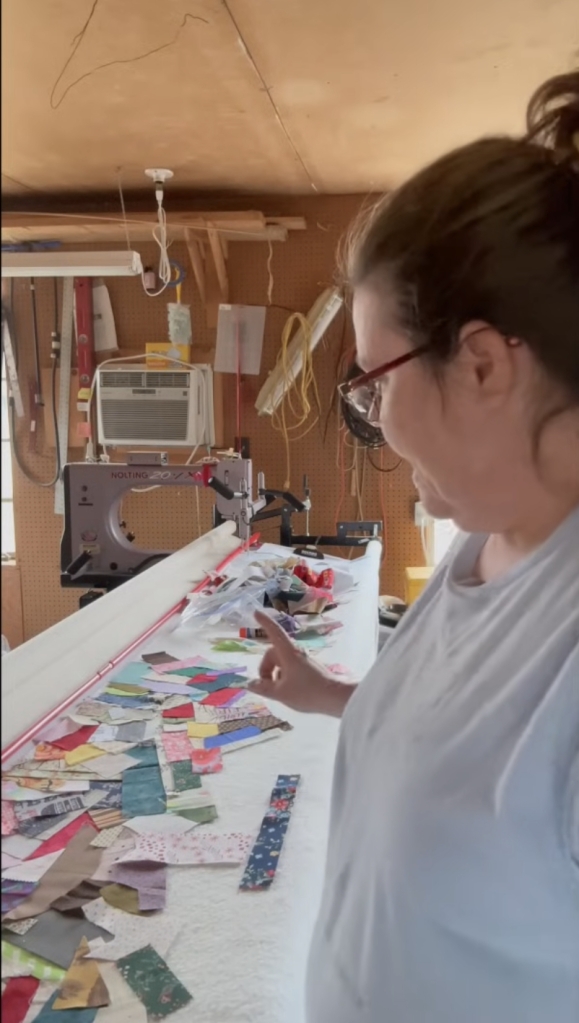
Well, it seems like eons since I posted a block for the quilt along! Sorry. Project management has become a problem. Today’s quilt along block is called Mosaic and it is an easy build!
Here are the templates. I highly recommend using those. But you could just get away with cutting those odd edge triangles as squares to start out with and then just have a bunch of fabric waste. Your quilt and fabric your rules.
Here is my block colors. Choose whatever you like. It looks like the main squares and the large half squares are 2 5/8. The small corner half squares are 2 inches.
Basically you sew your rows together in the block, trimming your dog ears along the way. And voilà!
Trim your block to 6 1/2 inches.
I am envisioning a large scrappy quilt full of these blocks. Oh the possibilities! Compared to what we have made for this quilt along, this one was a breeze! If you are curious to see all the blocks, or want the free block resource, make sure to check out that post here.
My goodness this past month has flown by. I have been very busy in the quilting aspect of things. I got my Mona Lisa quilt completed. We all know the original Mona Lisa was not that beautiful, but she is still a work of art. This process is outlined in the second half of the first video, and all of part2 video.
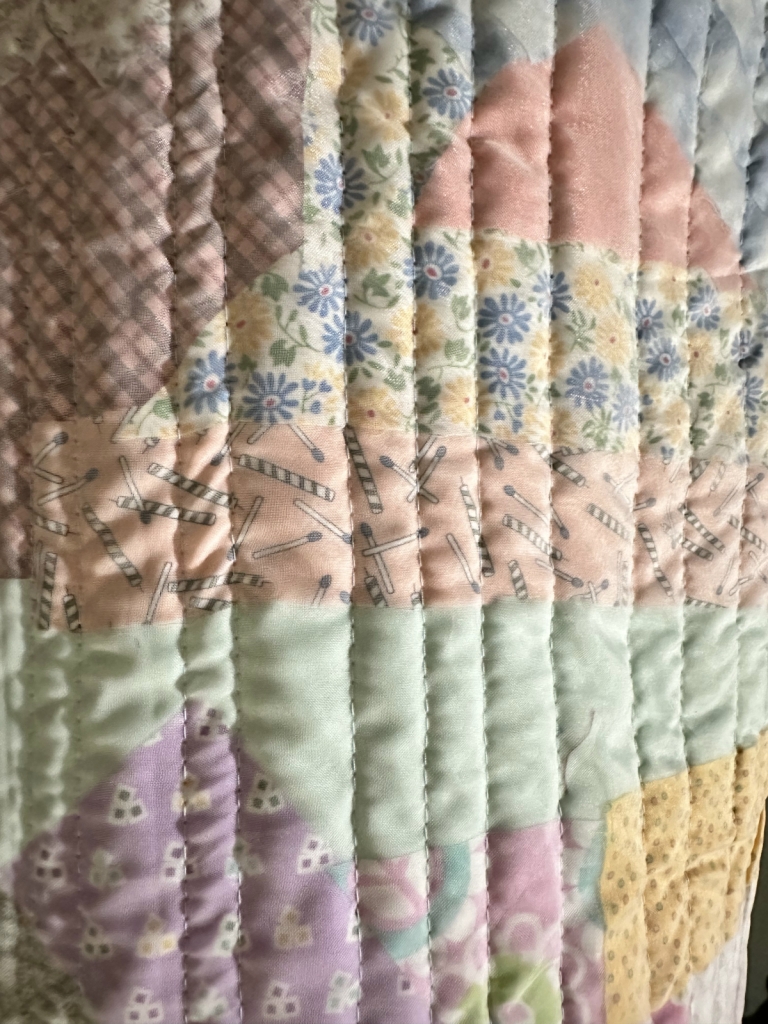
Basically this is a gob of raw edge scraps just thrown onto the longarm in no particular pattern which then gets encapsulated with organza. This is great for orphan blocks that are not the same size or very strange shaped scraps. This works for the straight cuts and such too.
I chose to quilt this with uneven spaced lines. It adds a modern touch to this scrappy event.
And to look at the quilt as a whole really looks like abstract art. I am not a fan of abstract art, but really like how the dark colors are softened with the organza and how artsy fartsy this looks because that is not my style. I created something abnormal for me. I used about 4 gallons of scraps. I could probably make this repeatedly for about 15 quilts.
And here is the completed quilt. And yes, I am calling this less than pretty girl, Mona Lisa. She is not much to look at, but she is a work of abstract art. HAHA.
This has me brainstorming about my half square triangles. If I just press them open I could do this and not have to square them up, nor make them all measurably the same size. Hmmm…the gears are turning.
Additionally I got back to some scrappy swap squares from 2019. I took those 9 patches and made them into stars. There were not very many in the swap, but I wanted a quilt of usable size. So I put those scraps to use. The center 9 patches of the stars were from a TOGA (treadle on gathering academy) retreat and each of those blocks is signed and the vintage machine listed. I hold these very special as the group moved to a different location which I can attend, it just is farther away….one day.
I am also digging through my Kaffe Fasset and cutting those down into precut sizes and using those up. Even though they are on the large size of scraps, I guess everyone defines the size of the scrap themselves. It is alot like a personal 1/4 inch LOL.
I have been busy busy. And I am on the planning committee this year for our annual quilt hop. This will be some scrappy quilt patterns when the time comes I will make sure to share that design too.
Be sure to check out all the scrap happy loveliness below by clicking the links. And thank you for reading my blog!
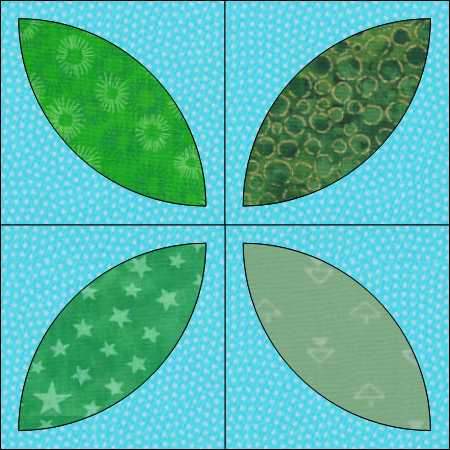
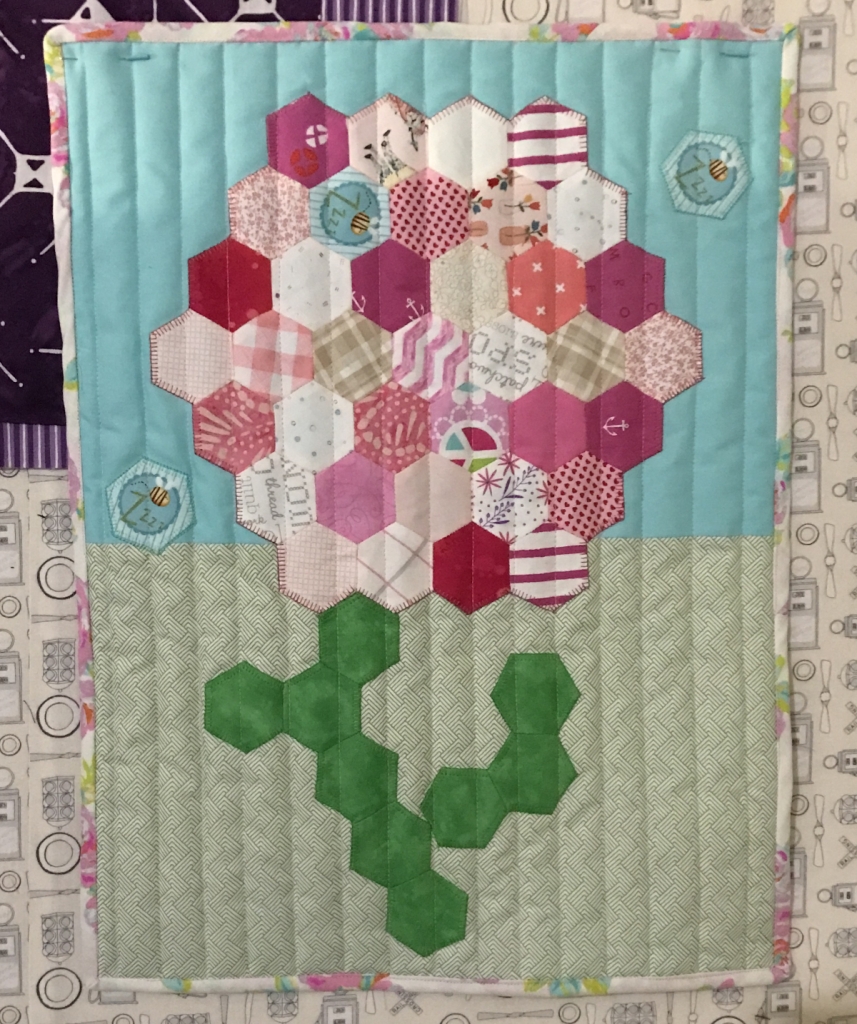
How many of you own Kaffe and admire it and pet it, but never quite use it? I find Kaffe so beautiful that I don’t want to cut it up. And then when I go to cut it up and make that commitment, I realize that if I cut one section, I might end up with no cohesive design with the block I am making because the loud colors change so drastically, that one part of my block might be orange, another might be green, and yet another might be purple. I came to the idea that the larger you leave the fabric pieces, the better off you are. I designed a 12 inch finished block in the shape of flowers.
Kaffe replicates nature beautifully and can make this girl drool with the neatest toadstool I have ever seen. He makes flowers, fruit, leaves, dots, stripes, chevrons, and circles. Most of the repeats of these prints are on a grand scale, so beautifully designed. I am writing this pattern and calling it Kaffe Flower Fields. It is not a formal pattern but this blogpost. I have templates you can download and will have cutting directions and assembly right here below.
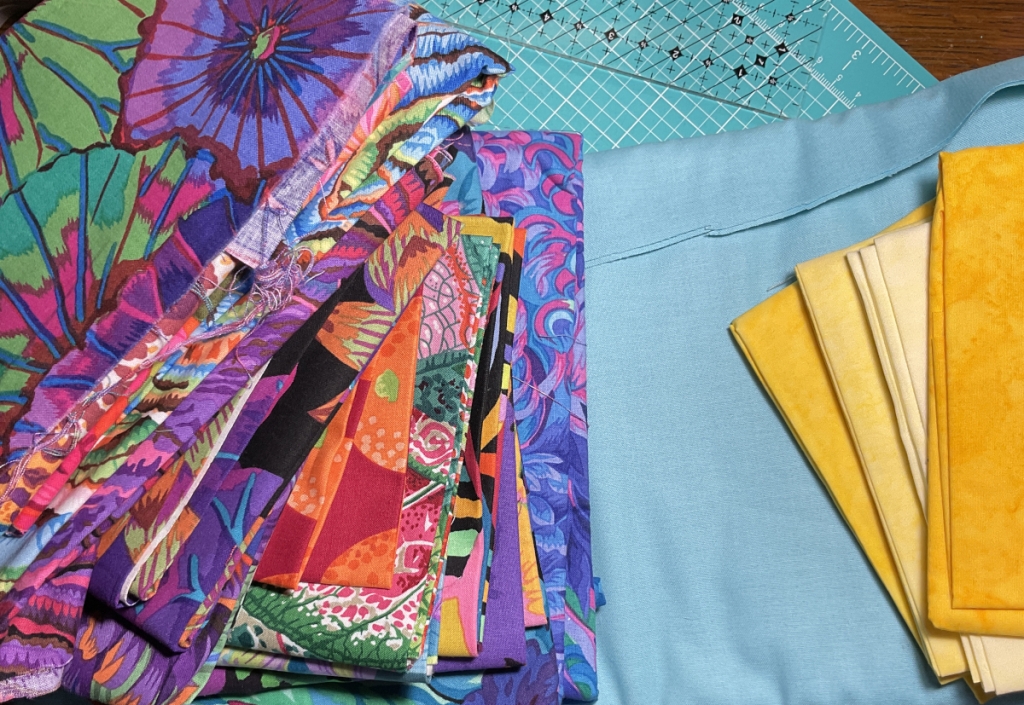
For the sake of simplicity, this is precut friendly. Which precut? You can use fat quarters or vegas strips. For those of you who do not know what a vegas strip is, it is wof cut into 6 1/2 inch strips. Most vegas strips come in a color coordinated pack 20 strips to a package. If you do not want repeats of Kaffe you will need more than 1 package of Kaffe vegas strips.
Here are the templates. Note, the melon is showing the feature of turning under a 1/4 inch. If you do not want to turn under your melons, you can cut on the inner most line and fuse that to the block raw edge appliqué style. I demonstrate turning under the melon in my video, and because the time it took, decided to skip that and just do raw edge appliqué.
The pdf above confused all the letters of the alphabet. You will not need to worry about those. You also have multiple templates, but only really need to use one. If you will notice there is a square, when you print this out, make sure your square measures 6 1/2 inches. If it does not, and you continue, you run the risk of your melons not being the appropriate size. For each leaf 12 inch block you will need:
background fabric
cut 4 (6 1/2 inch squares)
Melon fabric
fusible web cut into 6 or 6 1/2 inch strips
kaffe fabric vegas strip
melon template
pins, magnets, frixon pen (this will be helpful when cutting out. I had the best luck pinning and cutting with scissors.
Fuse double sided fusible web to back of vegas strip (make sure you are using a teflon pressing sheet or parchment paper to keep your ironing board and iron free of the sticky goo). Using template, cut out 4 melons of Kaffe fabric. Using care, center melon on to background fabric. Align each tip of the melon in the corner so they are equidistant from the background corners. Fuse melon to background square. I chose an appliqué stitch to keep the raw edges from fraying. However, this will be your quilt, so you do you. Repeat the melon make 3 more times. You are now ready to assemble your melon fused squares into a block.
Sew your background squares together like this 4 patch. Make 12 of these 12 inch blocks. These blocks will measure 12 1/2 inches and finish at 12 in the quilt.
Now for the flower. All these are, squares that are snowballed using the covered corners method.
2 fat quarters for the center yellow or four 2 1/2 inch squares per block (both of these fat quarters are enough for all the flowers) (qty 54 for all 13 blocks)
1 vegas strip or fat quarter (13 times)
cut into qty four 6 1/2 inch squares
background
qty eight 2 1/2 inch squares (104 squares total)
When you cut your Kaffe prints, pay attention to pattern repeat. And stagger those repeats across from one another. After building these flowers I realized that Kaffe repeat is around 12 or so inches so two of your 6 1/2 squares are going to be very similar and the other two are going to be very different LOL.
Using the covered corners method (I demonstrate in the video using my Doug Leko ruler for snowballing). I always start with the yellow square and do that first. Then I rotate the block counter clockwise and place a background square on that corner and snowball. I rotate counter clockwise one more time and snowball that corner. For pressing on these, I recommend the two blocks catty corner from one another are to be pressed in, and opposite should be pressed out. All the background corners can press out. Now that all of your blocks are snowballed, you can assemble the 4 patch. Make 13 of these 12 inch blocks.
Borders are drawn and for the sake of ease, use 8 vegas strips or cut 8 strips of background wof by 6 1/2 inches. I am not sure I am even going to bother with the borders.
This quilt is well on it’s way. I have a video that I need to edit. There was an epic fail (1 battery died, and 2 the turned under appliqué, I still need to do some filming. Be looking for that video to post soon. Lots of things are in the works….hang tight, we will be getting back to the quilt along blocks very soon.
And I know there were some people who were really looking forward to this post, so it is a little rushed. Forgive any typos. And if I did not explain something clear, please reach out and ask questions. I will be happy to answer them.
Those of you who are following me know that I am in the middle of a quilt along. I am also in the process of making a legit kits. I have been struggling with both! I feel the quilt along blocks are nagging me like a bad husband. I don’t even want to touch those blocks right now. (insert frowny face here). I guess the thought of them going on for atleast another 20 weeks is a downer for me. I am so focused on when the finish might be that I have lost my steam for now on these blocks. For those of you who are doing the quilt along, this gives you time to catch up, take a break, move onto something else for a bit. I am hoping that my posts will resume next week. But for now lets talk the legit kits.
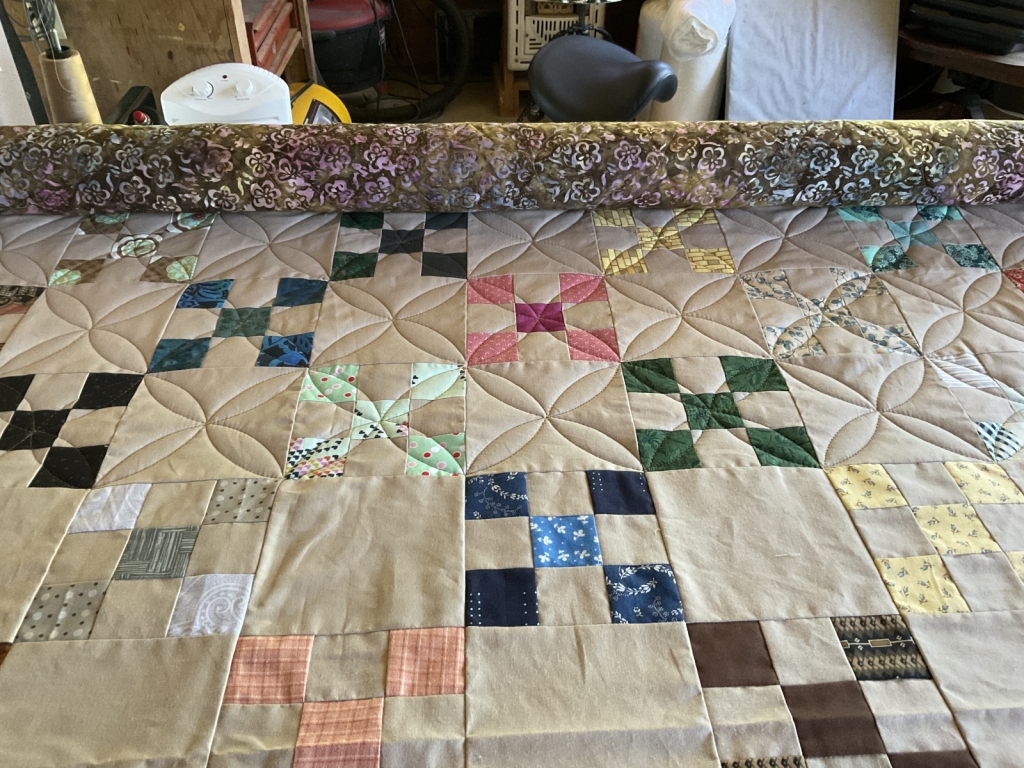
I got the three top rows completed, and the very bottom row done, and am a good ways thru the second to the last row. This quilt was way worse than a nagging husband. This quilt was torture for this content creator. I actually love the process and the precision of this paper pieced kit. And I will add that these kits are beautifully engineered to ease the difficulty. I am not speaking bad about the company or the kit. But, for this scrap quilter, I just could not go on. My first mistake is choosing this kit. I really loved the 3D idea of the quilt. As some of you might know, I love color and the happiness associated with color. The grey background is my least favorite color. So if you are thinking about purchasing one of these kits, make sure you are in absolutely in love with all the colors of the quilt. Constantly processing grey make in every block just could not trip my quilting trigger so it became a stall. The excitement became drab. And drab does not speak to me as a color except down and depressed. So to eliminate the stress this quilt was giving me, it is now shelved. This may become for sale in the future. But for now, I just needed a break from it! This project and I are now separated as of last weekend. And my quilting woes immediately rectified and all came back to me in all their glory.
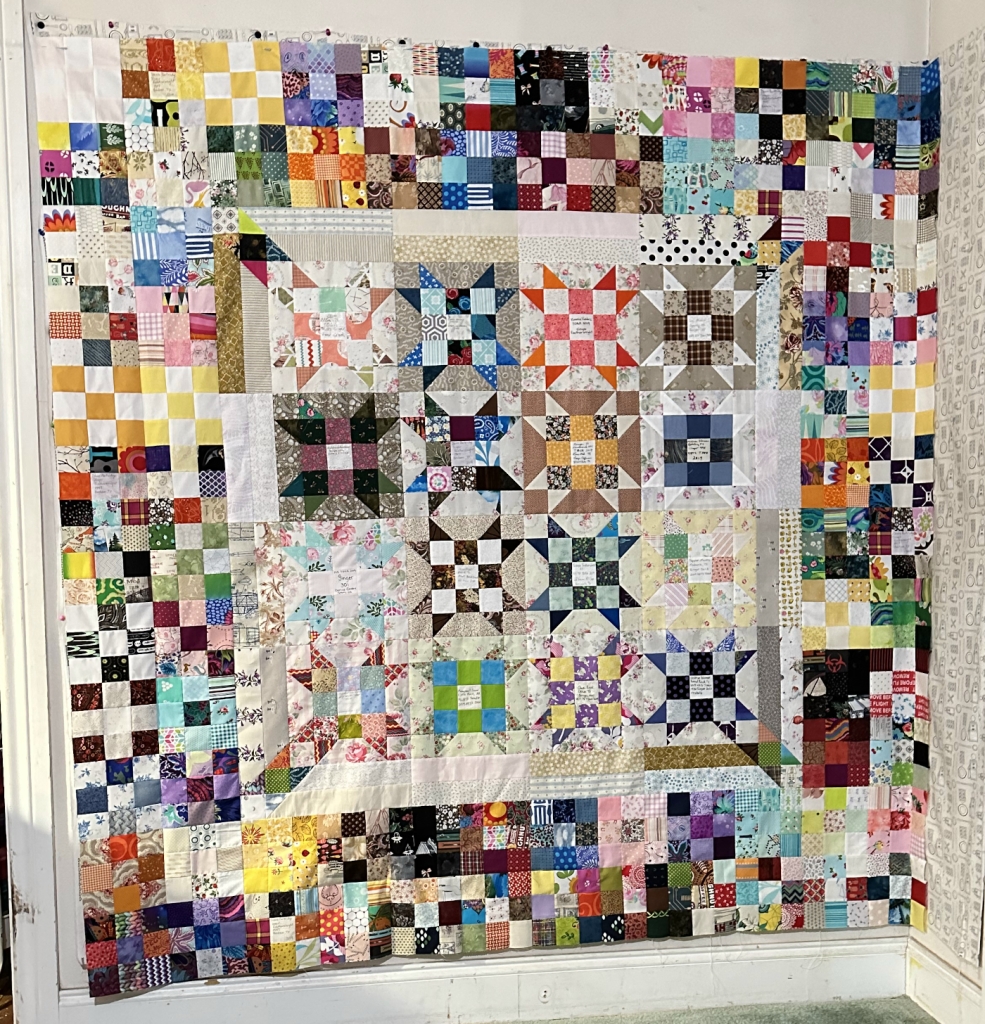
A good while back in 2019 I attended a TOGA or Treadle On Gathering Academy where all us vintage sewing machine enthusiast gathered in rural Texas for our yearly retreat. Some of the ladies participated in a block swap which was an easy 9 patch. I had laid this out in 2020 to try and figure out what I was going to do with these signed blocks from the swap. Last week my minds lightbulb turned on very brightly and I started to get to work to showcase these lovely signed 9 patches. I decided to make the into the super stars that they already were. And in one week got this project into full top status. My backing is sewn, my binding is ready for this quilt to get loaded.
For those of you interested in my scrap processes, make sure to check out my video on what I am calling Scrappy-Do.
Even though the color saturation is a bit off for some of the blocks, I used oodles of scraps and made them work for me. This measures 72 by 72 and just in one week!
And while my momentum was up, there was also a procrastination of sorts. My kitchen chairs are 80 years old and were in a major need of recovering. So I got three of the 4 chairs done. My body will have to heal after working on the floor for hours pulling all my unused muscles from not being used to that. Man alive, I ache. But that will be gone in a couple of days. Here are the before and after photos. Lets see how long this lasts. If this lasts half as long, I will be dead by then and that will be ok with me.
So, right where the plywood base has those circles, is where the chairs started to tear. This was surprisingly thin vinyl. Those holes were air holes so when you sat down on the vinyl, the air would escape and the chair cushion or what was left of it would compress. The chairs were orginally made by the Brody company in Chicago IL, or so said the underside of the original cardboard bottoms I removed. The legs and back are welded and only have 4 screws into the wood. For that being such a simple design, it sure has been sturdy and lasted. Now Chenille upholstery fabric is on the chair seat. The chair backs are not torn and match the formica table so I left the chair upper alone.
So what does my coming days have in store? I have decided to make another Kaffe quilt. This one will be flowers. I have done my fabric pull and am already liking the fabrics together.
While I am doing laundry today I will probably start this. This will be an easy build and pretty quick too. Be looking for progress on this soon!
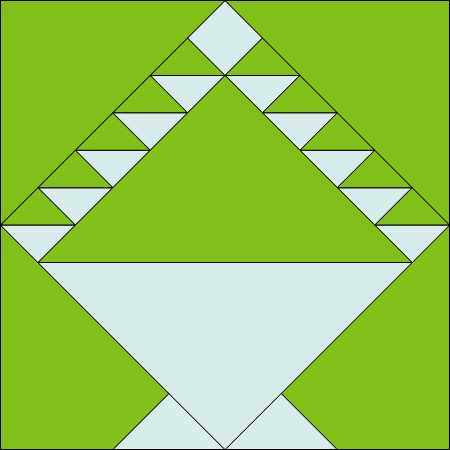
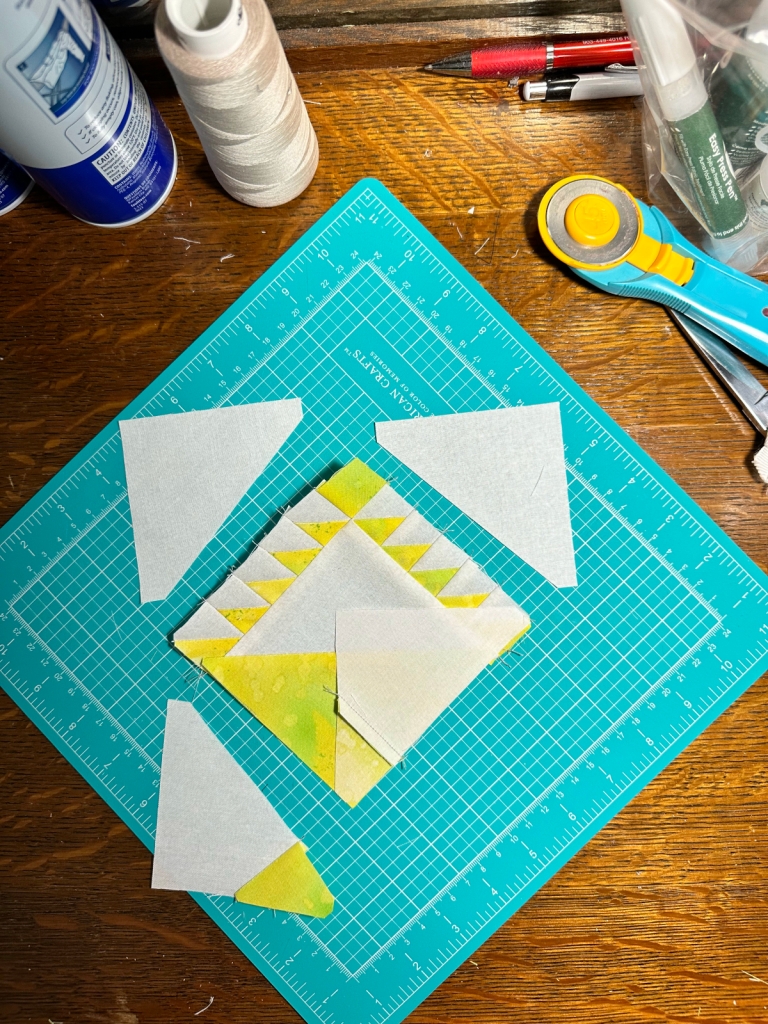
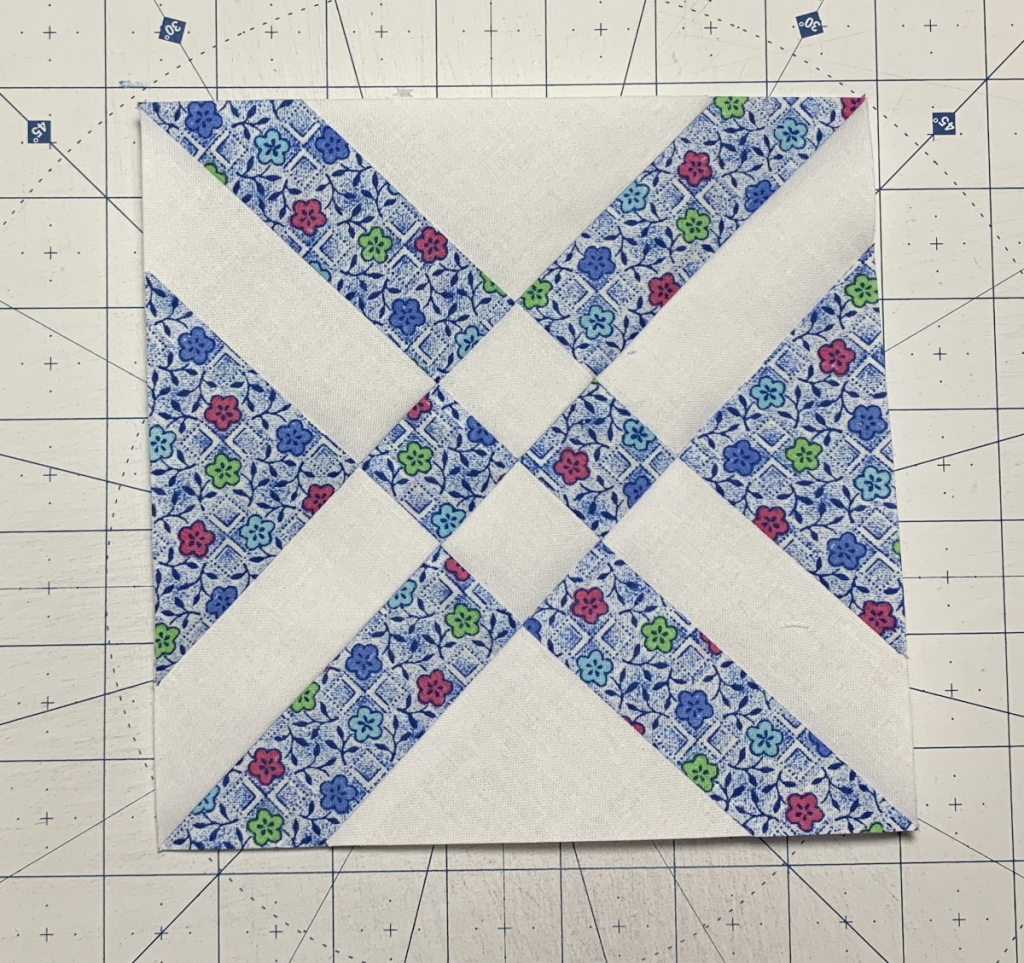
It has been a hot minute since my last post for the free pattern quilt along. Todays block is the fruit basket block. *disclaimer I done my block in the wrong colorway! Sometimes I just don’t have my thinking cap on.
Proceed in which ever colorway you like. I failed to do mine in the assigned color in the legend. But, I am not redoing it because this was pretty labor intensive.
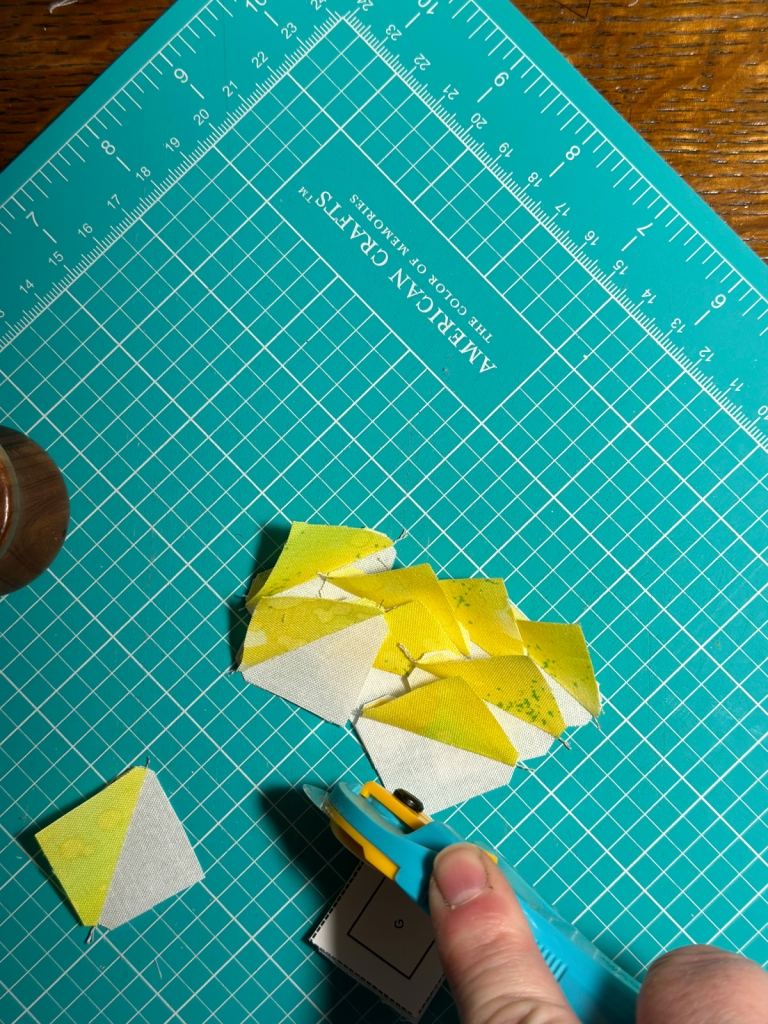
Step one download the templates. I would utilize all the templates. And yes, I have verified these are accurate. Step 2 cut out all your pieces. For reference I have written the sizes or approximate sizes on the pieces. Again, use the templates solely for this block.
Make your HSTs for the handle of the basket. These are a funny measurement.
Step 3 After making your HSTs it is necessary to use template G and trim them down to that weird size.
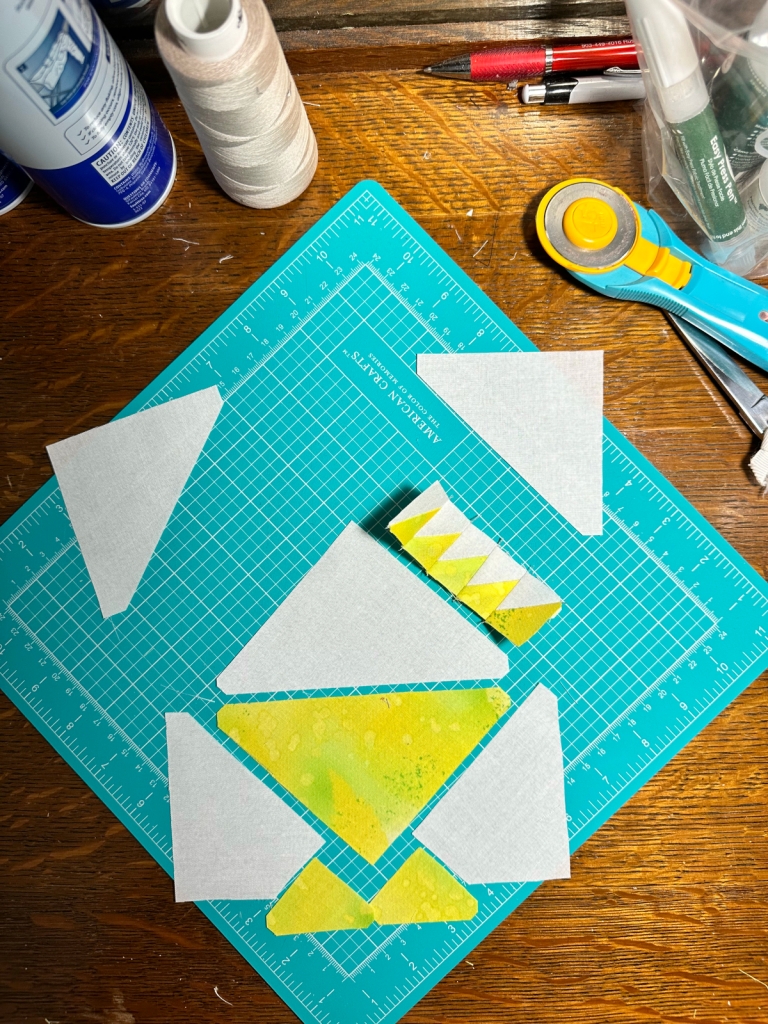
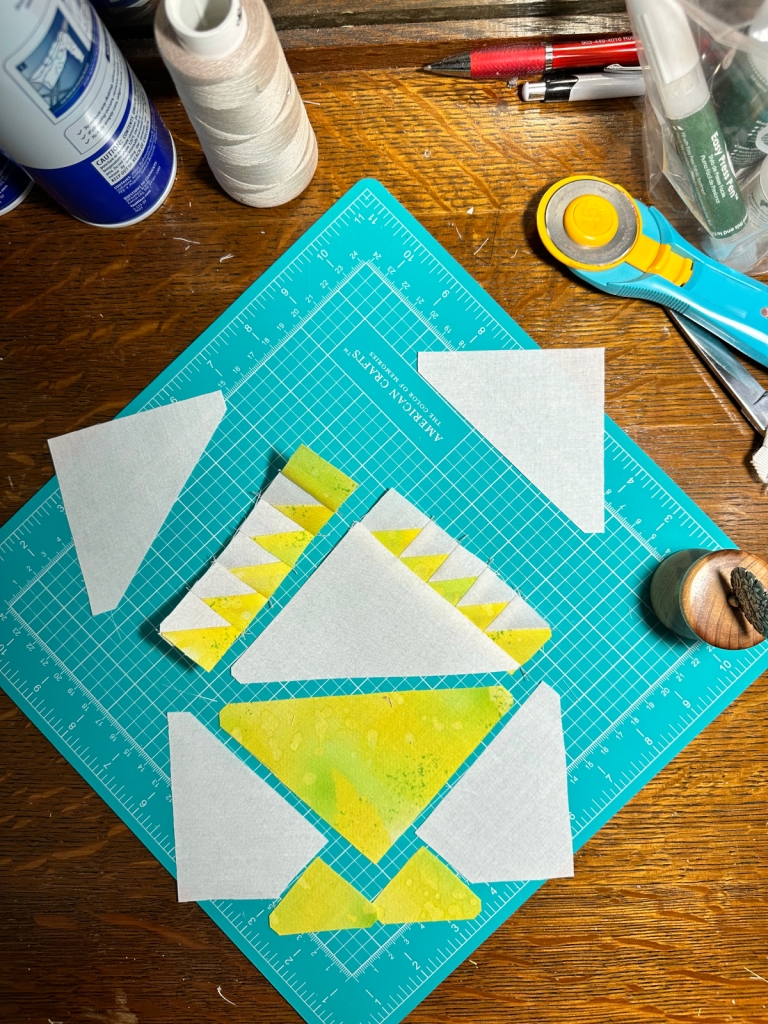
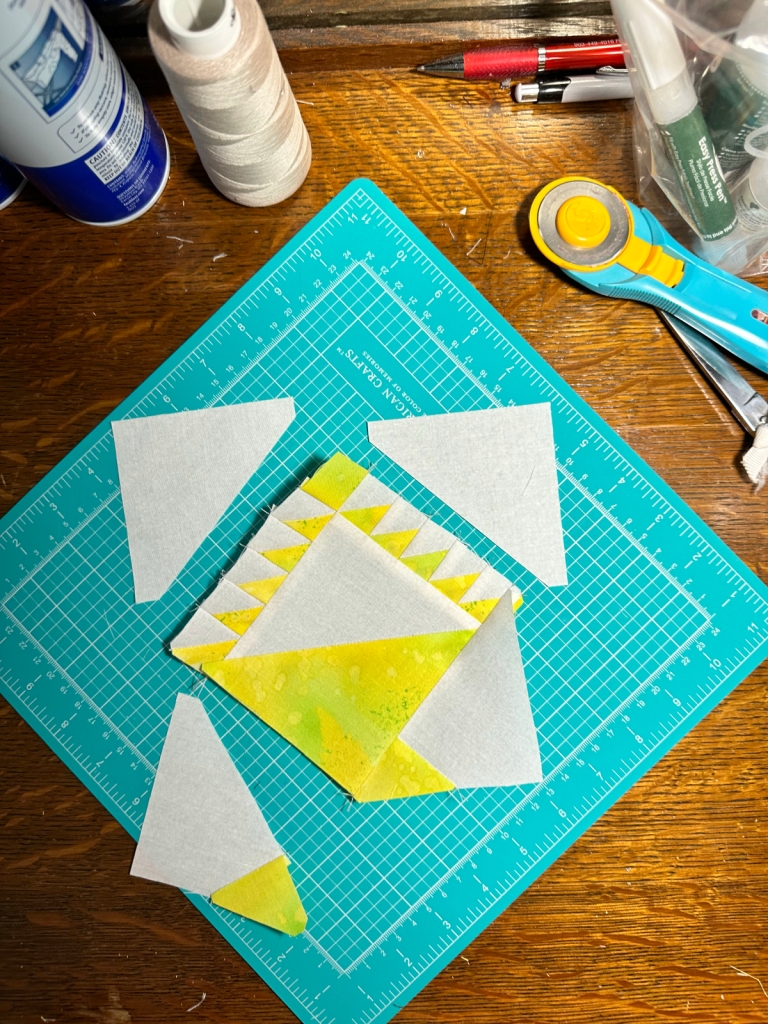
Step 4 Layout your pieces. The remaining steps I did, I probably would have changed up just a tad and sewn the center HST together before joining the handle. Follow the pictures step by step and sew your pieces.
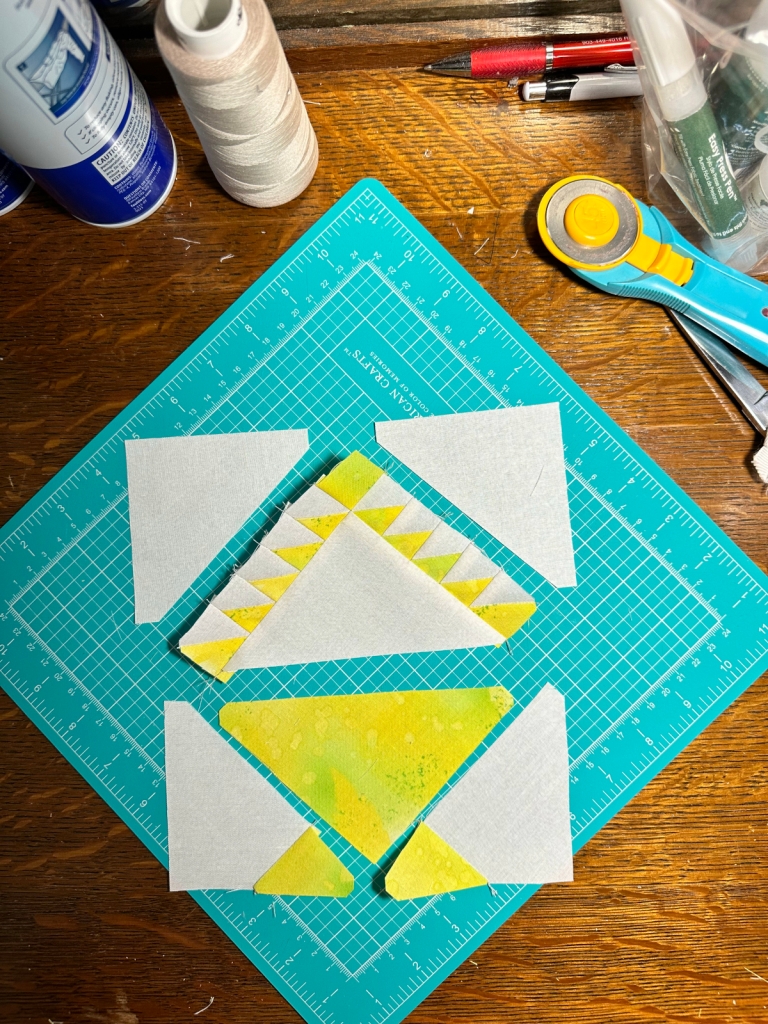
And now just sew those remaining corners. This was pretty labor intensive but not hard.
Viola!
And for those of you who are here for the first time, you can go fetch all the blocks. Click this link to get to the rest of the quilt along free patterns/links.
Did March come in like a lion or a lamb? My daffodils have already bloomed which is waaaaay early. The blue bonnets are popping up already which is waaaaay early. The weed bloom for January was late and did not happen until February. Spring is marching in, but the rhythm in nature is a bit off this year. Here in the states we supposedly had the warmest winter of all time. But I did not notice a difference. Our rain pattern was different this winter. Our March came in like a lamb, so it will go out like a lion. Towards the end of March is when tornados and stormy season starts. As much as I appreciate the wind and the rain as they have their purpose, getting it all at once is a bummer. Hopefully, that algorithm in nature will be off, and we will not go out like a lion.
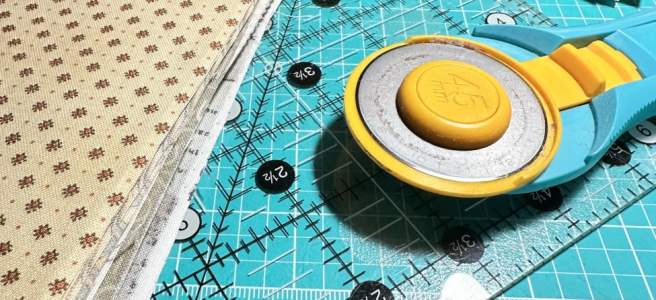
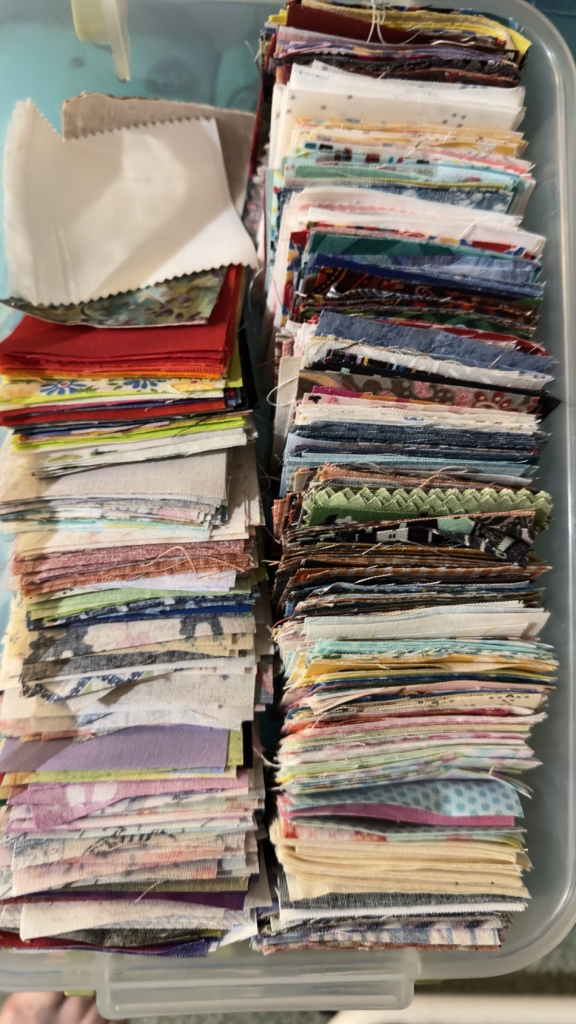
What have I been up to? I have been taming my scrap pile. I had recently bought some nice new neutrals and decided to purge the smaller pieces in the bucket for that colorway. I worked at it for 2 days and still did not finish, but my neutrals are all in order (sorry not pictured, they are in order for me, but probably not according the general public LOL).
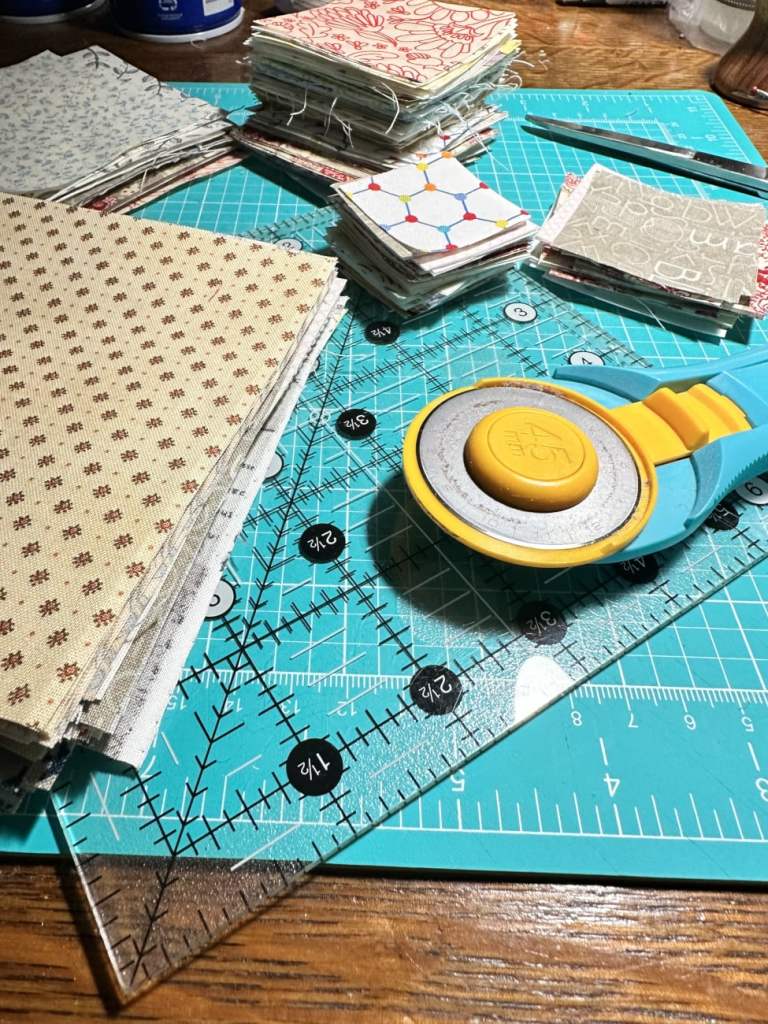
You would look at this and not even think this pile of scraps was much of anything! I methodically started with my bigger pieces and cut those down to the largest size possible that I keep on hand. So, I ended up with some 5 inch squares which will eventually come in handy. Some 2 1/2, 2, 1 1/2, and 3 1/2 inch squares. I did not count these but I bet just of the 2 1/2 inch squares I ended up with about 800 pieces.
The far side of my bin had hardly any fabric squares when I started taming the scrap demons. This shows the real work, unlike the first photo. What will I make with this? No clue, but when I decide, because all the squares are cut, it will be a fast project!
This bin is messy and I have never had to double stack my fabrics. Again, not sure what I will make with my 2 inch bin but it will come together quickly. Most of what is on the top layer is what I ended up cutting up over the weekend.
And my 5 inch and 1 1/2 inch bin is completely full. Those neutral charms will also help me add to an existing charm pack and make a nice size quilt relatively fast when the time comes.
And finally my 3 1/2 inch bin, which I normally do not keep, but am needing to get going on my cathedral windows quilt, and have been procrastinating because I needed more variety in my squares.
Right now in my “quilting career” I am rather paralyzed by all the projects I have and the content I need to make and promote. I am finding it difficult to decide which direction to go, and so I have not really worked much of anything in the last 3 weeks. I am hoping to change that by the time this blog posts.
I am still working on this at the longarm. I am just laying my scraps over my quilt sandwich and then laying organza over that and quilting it. This method goes pretty fast, I have been delayed by the cooler weather. I did get back to it this week, and am more than halfway done. Unfortunately it turned cold again, and my weekend is booked with car repair and grocery getting. Will get back to it eventually.
I have entered a Texas contest for quilt blocks. Our agriculture minister is hosting a contest for what agriculture means to you as a texan and I have signed up for this quilt block make. They send you some scraps of fabric and you make a quilt block that represents Texas agriculture and what it means to you. I have not started but they give you an off white background, a stonehenge gold, as well as a bandana blue and a green. You can add your own fabrics, but I am still mulling over how I want to make the block. If my block is chosen and stitched into the quilt, my name will be embroidered into Texas history. I am looking forward to that make. In the mean time, make sure you to check out all the scrap happy links below. I am amazed every month how scraps are distrubuted into quilts and other lovely textiles. We all probably have enough scraps to be a scrap distributer LOL!
And for those of you who are here for my quilt along, I have two more blocks to post as they are done, but I have not written anything up. Here are a few of my latest scrappy blocks.
Here is a link to all the blocks if you sew chose to use up some of them scraps! Thanks for stopping by and reading the blog!
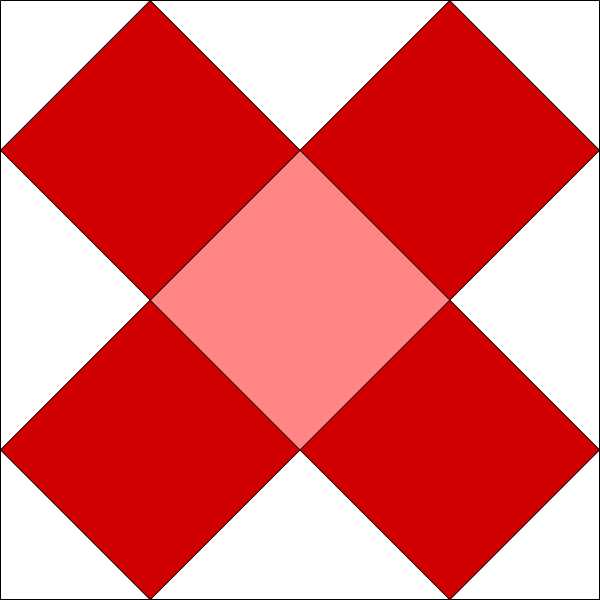
Today is the start of a new pattern for me. Today I am going to publish the templates with a few instruction here on the blog to keep you going, and to keep me going LOL. This block will require you to set a good bit of time aside to accomplish. There are 49 pieces! And Y seams! I am hoping in the previous videos I have made you have learned a great deal on Y seams, you got this!
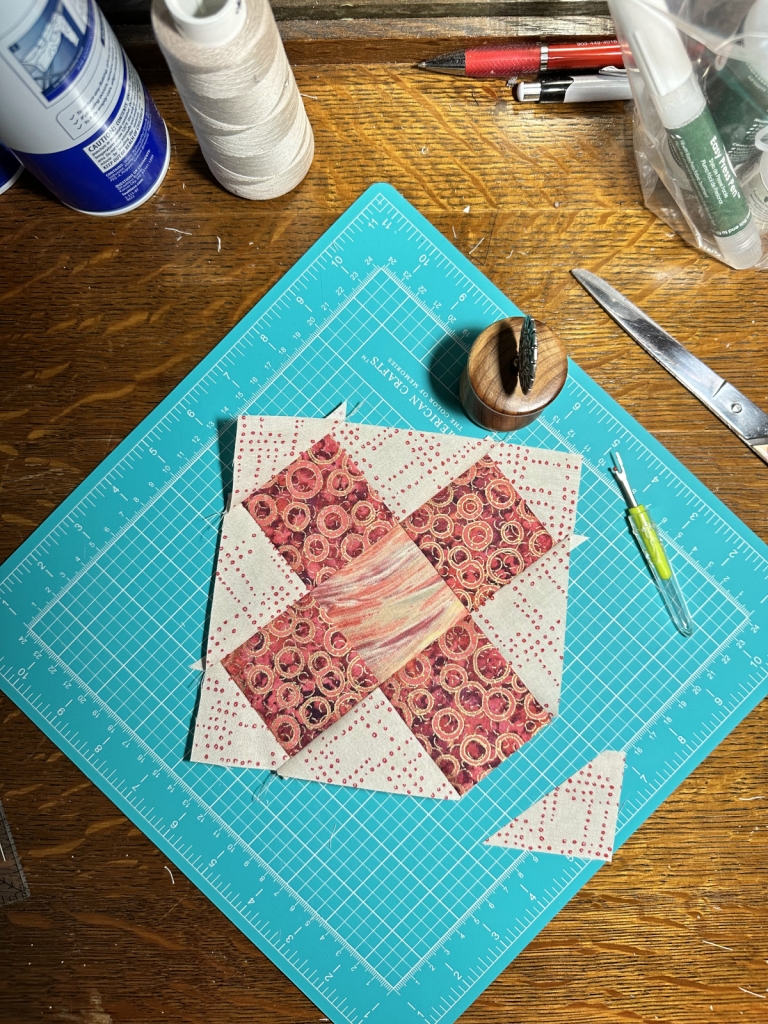
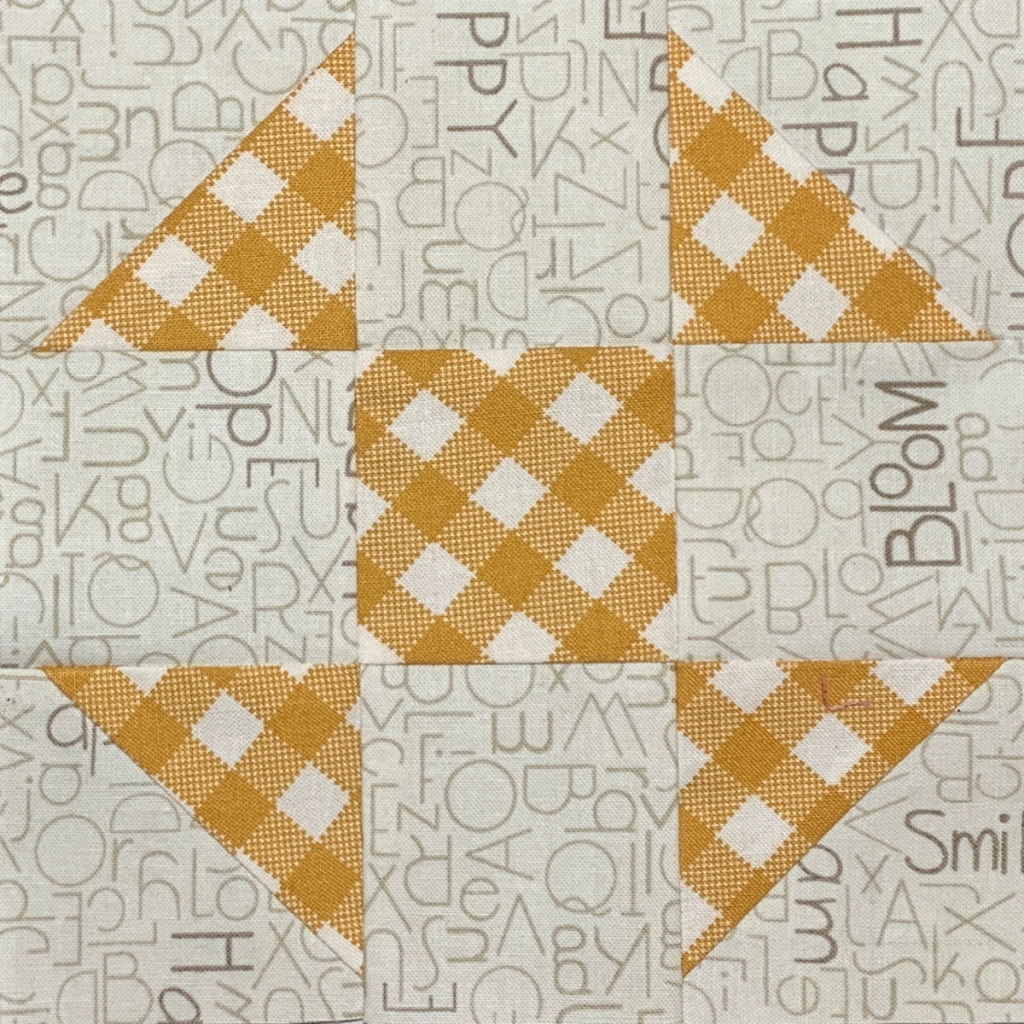
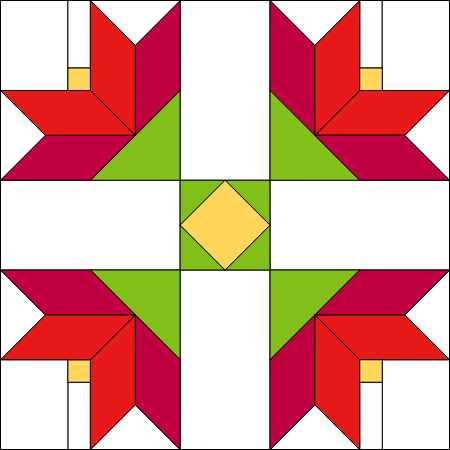
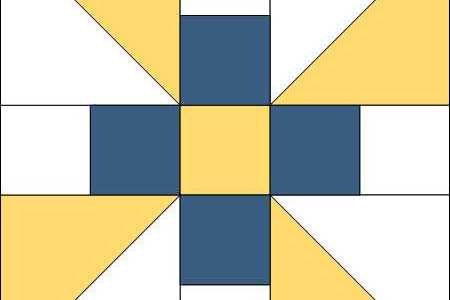
First thing you will do, is print off the templates. You will ensure that piece J measures 1 3/8. You WILL be using the templates for this including the rectangles. They are very funny measurements that may not be on your ruler. The color way for this block is two different reds, a gold, some green, and background.
Quantities as well as the colors are all called out in the cutting instruction.
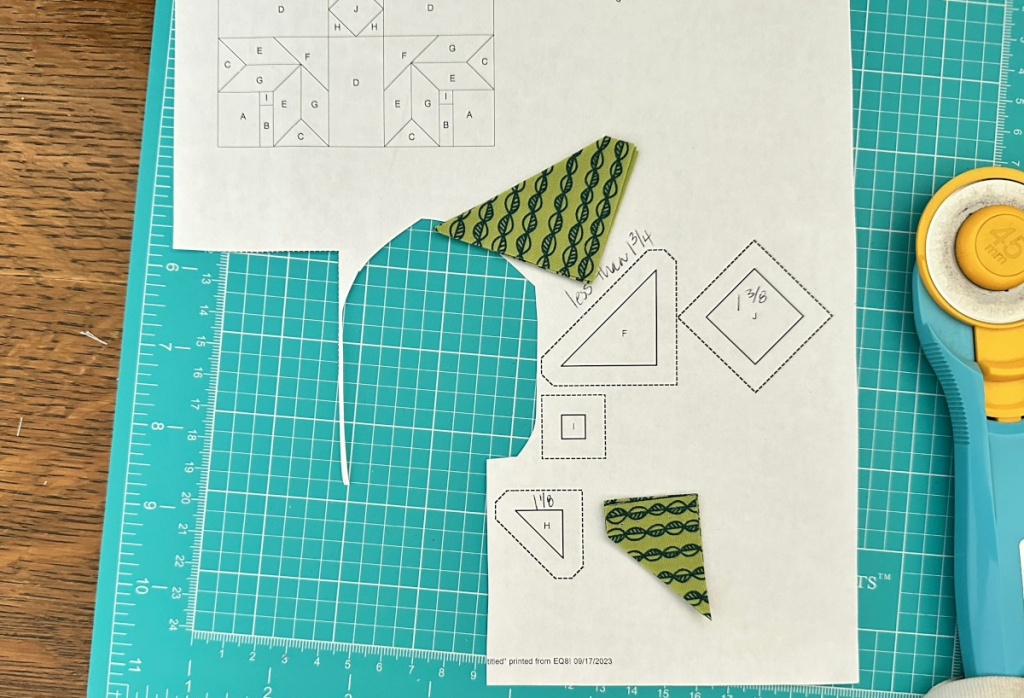
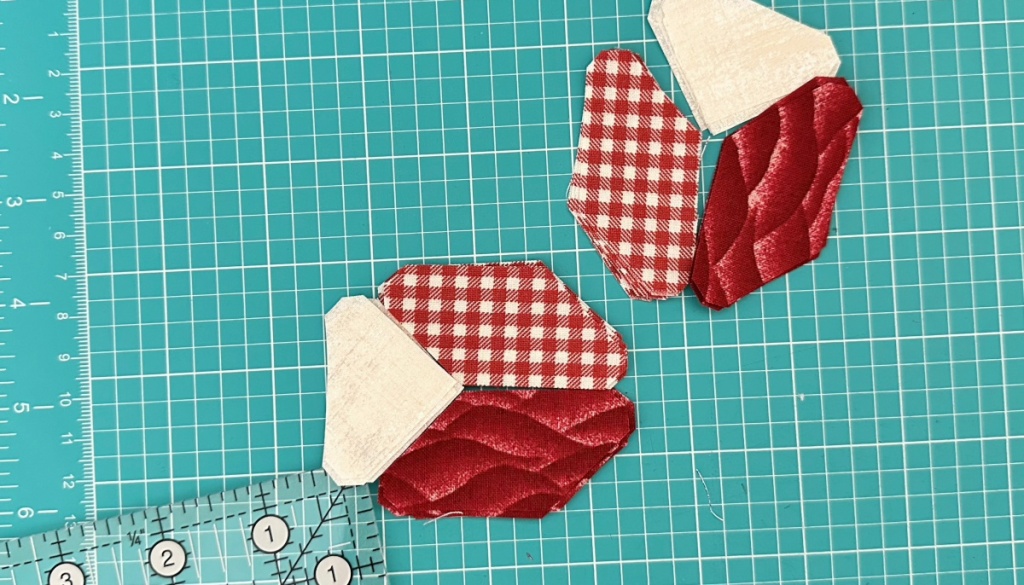
Yes, I used the templates for all the pieces above as well as directly below.
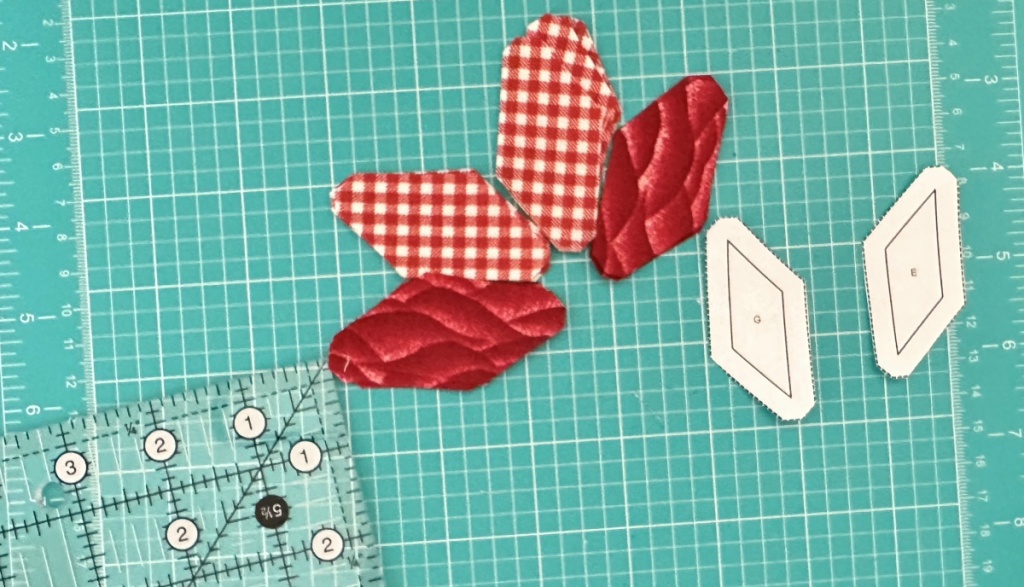
So for piece D and E you will cut both of your different color of reds. Make sure to knock off the notches on the corners, this will save you when you are sewing this.
You can cut piece H using a 1 1/8 inch strip and subcut using your easy angle ruler, but your easy angle ruler does not have a 1 1/8 mark, so it might be best to use the template for that one. For piece F the larger hst, the paper doll measures just under 1 3/4. I went ahead and cut mine at 1 3/4 strip and subcut with the easy angle. This piece/corner, is where we will be trimming off excess anyway. Piece J square you can actually cut using your regular rotary cutter at 1 3/8.
For quanties, you can always look in the legend of your template sheet and count the Js and Is. These are cut from gold.
Pieces H and J are used here. I recommend when you sew this, you fold these pieces in half and mark the center and align the centers. I also recommend you press towards the green. I tiny economy block!
Sew opposing sides first, then trim and repeat.
Now here is the tricky part, your economy block is going to be a weird dimension. It will be the same width as Piece D. Center piece D onto your economy block and trim right to left and up to down. This will get you a square the same measurement as piece D which is the mating piece in the block.
Sew piece I to piece B. Make 4
Now sew piece I/B to piece A
And now we jump to Y seams. Layout piece E and G like so.
Here I have placed piece C background. You can achieve this in any order. Here is the order I did mine. Special note, because these are Y seams you need to start and stop at the 1/4 mark where all these seams meet.
I started by sewing piece G to piece C. You will press towards the red but pressing is not important now, we will address that later.
Here is where the order does not matter, I chose to sew my two red pieces together, starting at the 1/4 inch intersection. You may need to pop a stitch if you sew too much. It is far easier to pop a stitch than to put another stitch in.
Here I have folded away the reds and proceeded with the last stitch from piece E to piece C. If I have done this correctly, these pieces will open up without thread showing and will not have any puckers.
I have the right most piece turned wrong side up so you can see how I pressed these. Open your red seams and keep your triangle shape when pressing. If you do this any other way, it will go wonky.
Now for the last Y seam. I chose to sew my background block to the petals of the red fabric first. You can do this in any order. Make sure to stop and start 1/4 inch where everything comes together.
Here I have both sides of the petals sewn to the background block. Notice the bottom block, the reds are not yet sewn together. That is the next step.
When you do this step everything gets folded out of the way and out of sight. The seam sewn in this is the short side of the red. Again start and stop guarding that 1/4 measurement right at the junction. If you have done this right, your mirror images will be perfectly aligned like in the photo above.
Again press the red open and keep the back ground square pressed like a square. Yay! Y seams are done.
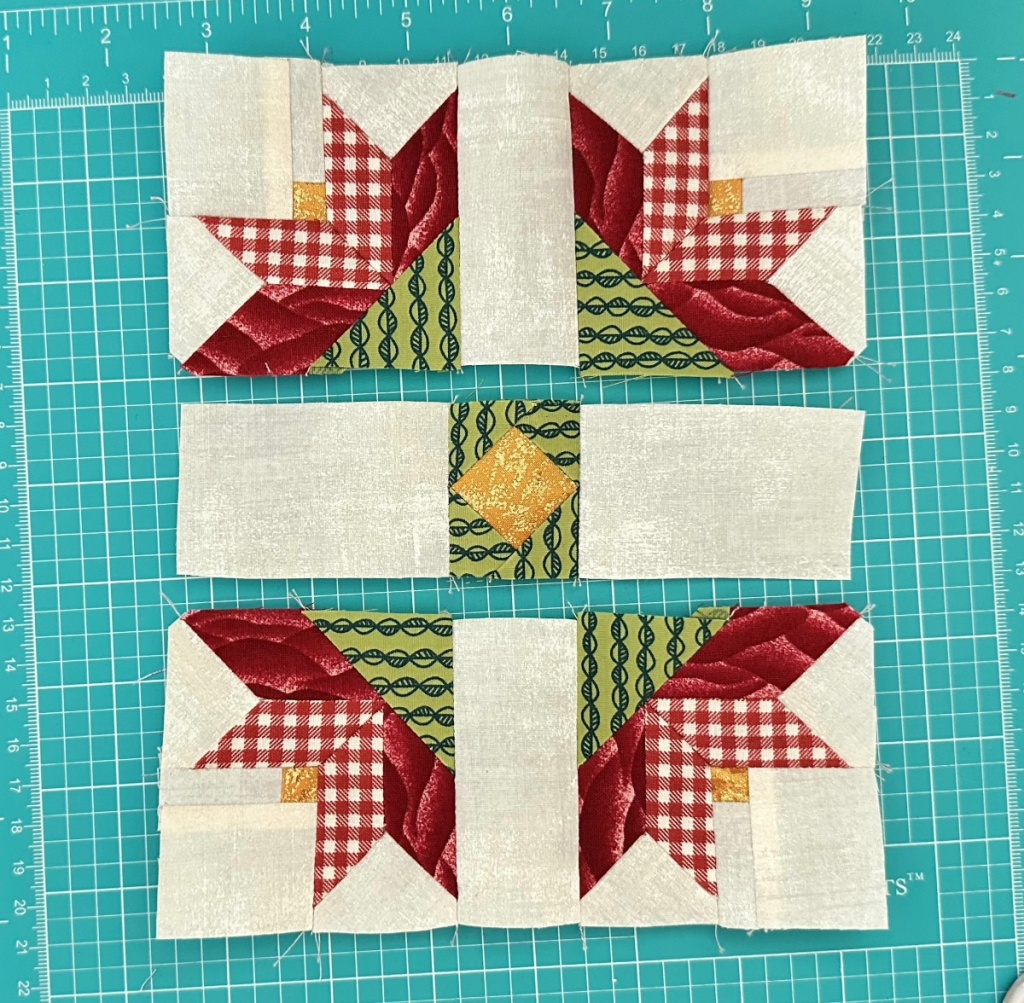
I recommend folding your green triangle piece F in half to find the center. Align the center of piece F to the flower center seam.
Before sewing your sashing in this block you will need to trim your flower blocks. They will measure the same length as piece D. If they do not, you will need to trim down your flower blocks. So you do not lose any points trim your blocks down on both green sides. Trim these to be 2 7/8 square. Do NOT square up the background corner. The background corner may be a tad wonky, but you have put a bunch of work into this block, you do not want to lose your points now. Proceed with making your 9 patch. Press this as you wish.
My block is not perfect, but it sure is pretty. This was a hard make. For those of you doing this one, Kudos for trying, Kudos for finishing. This one is really something. You will always remember the struggles when you gaze upon your finished quilt one day.
Well, it looks like it is a Freaky Friday situation. Yup, we have previously done this block already, except there is a slight change in the pattern. Today you will be utilizing scraps of grey, purple, and neutral if you are going by the quilt legend below:.
If you are looking at the quilt legend above and have not sewn one block, you will never be too late to start. This will remain free and out there as long as I am alive. Here is the link to all the blocks. And here is the electronic copy of today’s block.
Here are my fabric choices, I went a bit different than shown. Using what I’ve got.
And you to help you with color assignment you may want to use the template sheet legend and color that in so you do not confused like I did in the video. Here are the templates.
And here is my finished block, I am very pleased with the outcome.
The center of this, is bulky and could use a hammer to flatten.
Here is the video, it will help guide you to a block success.
Please reach out to me with any questions you may have, because I am so rushed to try to cram these in on the weekends, I may have hurried this and forgot an important detail. Thank you for understanding, and reading my blog!
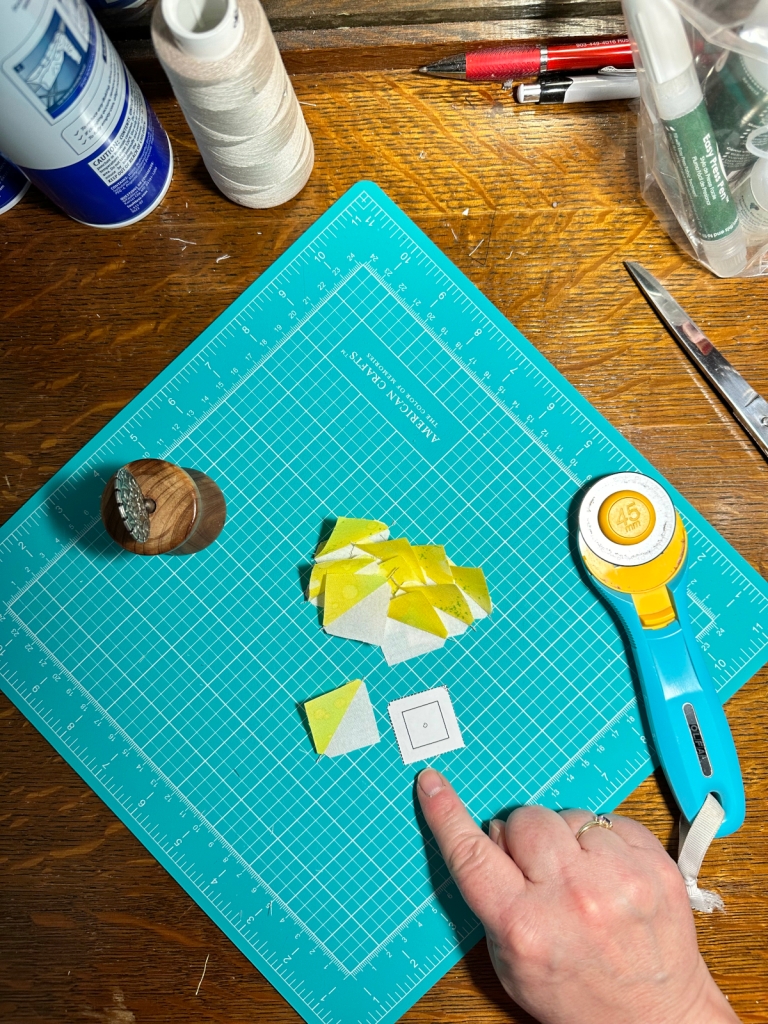
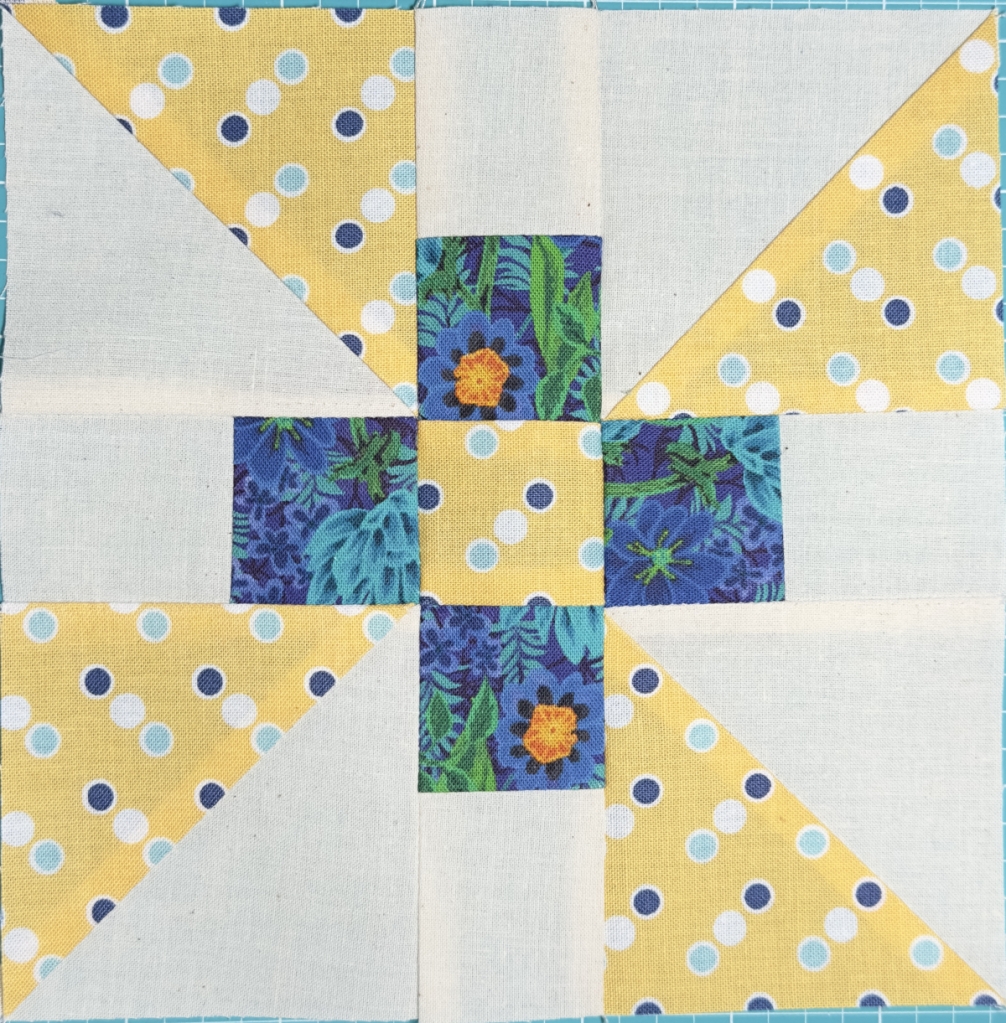
Today is another easy block build. If you are following the colorway in the quilt legend below, you will need a background neutral, a yellow, and a blue fabric.
For best results, you will follow the instruction on the youtube video. Here are the cutting templates to download if you so chose as well as the cutting instruction document. let me know if you like the cutting instruction document? Do you find this helpful?
I am very pleased with how my block turned out. The first block I made I will have to completely seam rip. It was less successful. But the redo is necessary.
And here is the video with cutting and advice on the block build. Because this block in EQ8 was originally slated to be a 5 inch block, it created weird cutting dimensions, which do not exist on my rulers! So I have simplified this as much as possible for you. I hope you find this block successful!
And if you are interested in any of the blocks you see in the quilt along pictorial, head on over to all those blocks and click here.
Hello scrap and quilting enthusiasts. Regardless of your favorite media of scraps (mine is fabric), us scrappy people are always looking for different ways to utilize our scraps. We keep things hanging around for a long period of time, just waiting for the right thing to happen. in the mean time, you have to store them. As far as fabric goes, I have been using a “system” now for about 5 years, and it has been a game changer.
Us quilters know when we make a quilt, if we cut the fabric to a different size you are left with a remaining size that might or might not be desirable. That fabric remnant no matter the size is considered a scrap. As I “process through my fabric” cutting down to the desired size for whatever block or border I am making, I start using my system. I place the unused fabric folded next to my sewing machine. After the pile wants to play jenga (haha), that is when I take the time to file it back into my “system”. The smaller bits and bobs get thrown into a basket. Larger pieces go back into the sorted ziploc baggies and into the tote. And when I have time, I trim those smaller pieces to usable sizes. 3 1/2, 2 1/2, 2, and 1 1/2 inch squares. Those get put into my bins. Because most of this fabric is already starched, these will be ready for use, and can become a quilt pretty quickly. A homemade precut so to speak.
And Yes, I open my charm packs to cannibalize for quilt projects that need scrappy variety. And those store nicely in the bin too. I have made the following quilts relatively quickly using this system.
Now if I cut a WOF strip and only use a couple of pieces, I leave that strip in tact and put it on a dowel pressing rod just above my sewing machine. As the rod has fabrics draped over it, when it tilts, it is time to bag up the scraps and move those to my tote. Those get folded nice and neatly and placed in a ziploc bag with the air removed and packed into the tote. All of these are also starched a relatively easy to use with minimal effort. I have made a couple of string quilts as well using this method.
And for about a year now, I have been mulling over a scrappy idea quilt pattern in my head. Do you remember the quilts called Crazy Quilts from years past? This is an example I found online.
What if, you could just lay your fabric on your backing and batting and did this without the decorative stitch. Laying them and not sewing them would not work, but what if you placed organza over the top and then quilted all the pieces within the quilt sandwich? That is exactly what I am doing. There is no size scrap that is too small or too big. Random pieces just flung about, and totally organic. I am doing this at my longarm, but you could use some glue and do this at your domestic machine. AND, MOST IMPORTANTLY, the WHOLE SCRAP is used FOREVER and does NOT transform into a different size, LOL!
I have videoed my endeavor on this idea, and it is working great! I will get yet another free quilt out of my scraps (I say free because some of those bits could have been tossed into the trash).
Weather permitting I will be in the garage scrapping away until it is done. I was surprised how fast I got a 3rd of the way done on this quilt. Eliminating sewing the quilt top is really trimming time to a quicker finish. You could do this on a smaller scale with some glue, on your domestic machine. Or you could go for broke and go large. I wish I would have snapped a photo of what I was doing but forgot. It is all in the video.
And as a side note, do not forget I am currently in the middle of a quilt along. If you are interested in making this from your scraps, the block patterns, linked here will never go away and are available for download when/if you chose to make this. I have not posted in a couple of weekends. I have a video made, and a block made, but dang, time just gets away from me. Eventually I will get to that.
Make sure to visit all the other bloggers for their scrap happy posts. Some of the scrappy ideas are genius which may inspire you to make a scrappy project. Here are those links with all their beautiful ideas:
And one last share, to be transparent, the next quilt I did have to spend about $25 to get some of the right colors called out in the pattern, so some of this is not scraps, but this one is finally finished. I love love love my purple background!
And remember, if you do not have plural-ness at the beginning of scraps, it just is crap, hahahaha! Thanks for stopping by and reading my blog!